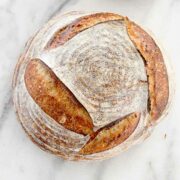
Basic Sourdough Bread Recipe Tutorial
This Basic Sourdough Bread is simple to make but tastes anything but basic!
Servings: 12 people
Ingredients
Levain Build:
- 65 g All-Purpose Flour
- 81 g Water
- 7 g Yesterday’s starter Recipe Here
Final Dough:
- 340 g All-purpose flour
- 38 g Rye Flour
- 226 g Water
- 10 g Salt
- 150 g Liquid Levain above
Additional Ingredients:
- Rice flour for dusting the proof basket if using
Instructions
Mix the Liquid Levain:
- The 12 to 14 hours before you want to mix your dough, build the levain. In a clean container mix the flour, water and starter. Stir with a small spatula until the water has hydrated the flour. With this small of a quantity I find it easier to double the amount of the levain build, so that there is room for waste and you have enough to make your dough. Here is a whole tutorial on building a liquid levain
Make the Final Dough:
- Combine all ingredients for the final dough in the bowl of a stand mixer fitted with the dough hook. You can also incorporate the ingredients with a paddle. Once the flour has been completely incorporated, let the dough sit for 15 minutes (autolyze) to develop gluten.
- Turn the mixer up to medium speed to develop the gluten. With a dough that has this amount of water, it will be difficult to develp on the gluten in a home stand mixer, so mix until you see strands forming on the top and the dough looks like it is pulling away from the sides of the bowl. This dough will not form a ball around the hook because it is too wet of a dough (this is what we want!).
- Scoop dough into an oiled bowl and cover with plastic wrap.
- Place in a warm spot for 30 minutes.
- First set of folds: Fold each of the four sides into the center, pulling the dough up and allowing it to smack down on top of the remaining dough in the bowl. This is developing more gluten! Cover and proof an additional 15 minutes.
- Final set of folds: Repeat the process as with the first set of folds. By the point the dough should hold together very well and stay in a ball in the center after you’ve completed your folds. If it immediately relaxes out to the sides of the bowl, you don’t have enough gluten and you should repeat this process again. It just means that you didn’t develop as much gluten in the mixer. This isn’t a bad thing! Its just a process!
- Bulk Proof: Cover the dough and place back into the warm spot to proof. Check the dough every 45 minutes. This will take about 2.5 hours. You want to oil or flour your hand and feel the dough. It should feel light and airy and not stiff or dense.
- Pre-shape: Dust the top of the dough in the bowl with flour. Turn the dough out onto a lightly (I mean lightly!) floured surface. Fold each of the four sides towards you into the center, turning the dough after each fold. This will create a little packet. Flip the dough so the seam in on the counter. Shape it into a round by using both hands to pull the dough towards you. Once you have a round ball with a smooth top, allow it to sit and bench rest for 15 minutes.
- Final Shape: Repeat the same process as with the pre-shape. Place the dough on a piece of parchment or flip it upsidedown into a proof basket that has been dusted with rice flour. Cover with plastic wrap.
- To bake same day: Place the basket back into the warm spot and allow to rise another 2.5 to 3 hours or until it feels light and airy and has doubled in volume in the basket. The volume will be tough to tell if you are proofing it on parchment because it doesn’t contain or control the shape of the sourdough. Proceed to the baking step below.
- To bake next day: Place covered basket into the refrigerator to retard the dough overnight. This will slow the proofing of the yeast and will allow you to bake 12-18 hours later.
- Baking: Preheat the oven to 450F convection or 470F non-convection with the Dutch oven or baking pan inside. Meanwhile, cut a piece of parchment a little larger than the loaf. When your oven is ready toss a little flour onto the dough then turn the dough out of the basket onto the parchment. [If you proofed your dough on parchment, skip this step] Score the dough using a lame, razor blade or pairing knife. You want to score midway between the bottom and the top. With this bread in a round shape, I like to make a square so that it rises straight up and maintains its round shape.
- Take the preheated Dutch oven from the oven, gently lower the dough into the pot and cover it with the lid. Place in the oven and bake 20 minutes. Remove the lid and continue baking 25 minutes or until the loaf is a dark amber brown.
- Remove the loaf from the Dutch oven, remove the parchment carefully, and then cool completely. This allows the crumb to set.
- Enjoy!
Video
Notes
Sometimes I will make an extra loaf and then cut it into slices, wrap it well in parchment then plastic wrap, and freeze it. I can then take out slices as I want them!
You can easily modify this loaf by adding fresh herbs like rosemary or thyme.
Nutrition
Calories: 134kcal | Carbohydrates: 28g | Protein: 4g | Fat: 1g | Saturated Fat: 1g | Polyunsaturated Fat: 1g | Monounsaturated Fat: 1g | Sodium: 325mg | Potassium: 48mg | Fiber: 1g | Sugar: 1g | Calcium: 7mg | Iron: 2mg