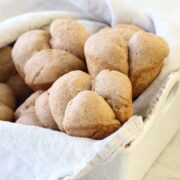
Graham Clover Rolls
These Graham Clover Rolls are hearty, filling and under 100 calories each! The bread is the perfect consistency, not too dense and not too airy, and the crust is crisp while the inside is moist and chewy. They are the perfect accompaniment to any stew, pot roast, or soup.
Servings: 32 Rolls
Ingredients
- 2 cups whole milk warm
- 1 ½ teaspoons salt
- 2 tablespoons molasses
- 2 ¼ teaspoons dried active yeast 1 packet
- 1 cup whole-wheat flour
- 5 cups graham flour
Instructions
- Add molasses and slat to the hot milk and let it cool until it is lukewarm. [Note: I am impatient, so I placed my mixer bowl in a larger bowl filled with cold, but not icy water and stirred until the mixture reached a temperature of 100 ° - 110° F]
- While your milk mixture is cooling, Add ¼ cup of warm water (100 ° - 110° F) to the yeast and stir to mix. Then added 1 t of sugar to proof the yeast. Wait 10 minutes and if the mixture has tripled in size then the yeast is healthy & ready to use.
- Add the proofed yeast to the milk mixture and stir to mix.
- Add all the whole wheat flour and three cups of graham flour. Using a bread hook attachment on your mixer or a wooden spoon, mix and continue adding graham flour until you have a stiff dough. I used about 4 ½ cups of graham flour.
- I then set my Kitchen Aid mixer with the bread-hook attachment on speed 2, and let it work it’s magic until the dough climbed up the hook and cleaned the sides of the bowl, about two minutes. Then knead on speed 2 for an additional two minutes. With this bread you want to be careful not to over knead because it is already a very dense bread.
- If you are doing the kneading by hand Ruth explains, “Press the dough away with the palms of your hand. Stretch the dough from the edge, folding back edge over to the center. Press the dough away with the palms of your hands, exerting sufficient force to cause the part folded over to adhere to the mass under it, and repeat folding. Turn dough one-quarter around and repeat kneading. Continue turning, folding and kneading until dough is smooth and elastic and will not stick to an unfloured board.”
- FIRST RISING – Grease large bowl with vegetable oil. I pour a little oil in my hands and then spread the oil over the insides of the bowl with my hands like fingerpainting. I find this more efficient and rather fun! Place dough in bowl and turn the dough in the bowl to cover all sides of the dough with oil. Cover with damp towel and place in a warm place (80 ° - 85°) for an hour, or until the dough is triple its size. There is no warm place in my condo at this time of year, so I pre-heated the oven for 10 minutes and then let it cool down to a comfortable temperature. An oven thermometer would be very helpful here.
- Sometime during the final proofing, you will want to grease your pans: two standard loaf pans or 32 muffin tins.
- SHAPING THE LOAVES – Separate the dough into two halves. Place dough into well-greased pans. Cover with a damp cloth and let rise until doubled in volume.
- SHAPING CLOVER ROLLS – I pinched off pieces of dough that were roughly the size of two large grapes, shaped them like a grape, and pressed three into each greased muffin tin. Working quickly, repeat this step until all the dough is gone. Cover pans with a damp cloth and set aside to rise.
- Cook loaves at 400° for 15 minutes and then decrease the temperature to 350° for the remaining 45 minutes. The loaves are done when the sides pull away from the pan, the crust is a rich, golden brown, and the loaves sound hollow when you firmly tap the top. You can also insert a toothpick into the center; the loaves are done when it comes out clean. Immediately remove the loaves from the pans to cool on a rack.
- Cook rolls for 8 minutes at 400° and then decrease the temperature to 350° for the remaining 10-20 minutes. I would start checking these after 10 minutes. I use the toothpick test for rolls. The others are too unreliable.
Notes
FREEZING INSTRUCTIONS: Bake rolls for 8 minutes at 400 and then remove to a wire rack to cool completely. Freeze in a large freezer bag. To finish baking them, take the desired number from the freezer, place them on a baking sheet, and bake in a pre-heated 350 oven for 15-25 minutes. The toothpick test will not work here. I found that the best way to test is to take one roll from the oven and try to pull it apart: if it starts to pull apart easily, it is done, if it provides resistance, pop it back in the oven.
Nutrition
Calories: 97kcal | Carbohydrates: 19g | Protein: 4g | Fat: 1g | Saturated Fat: 1g | Polyunsaturated Fat: 1g | Monounsaturated Fat: 1g | Cholesterol: 2mg | Sodium: 116mg | Potassium: 63mg | Fiber: 3g | Sugar: 2g | Vitamin A: 25IU | Vitamin C: 1mg | Calcium: 23mg | Iron: 1mg