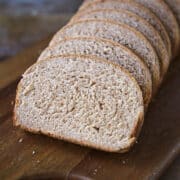
Whole Wheat Bread
This historic Whole Wheat Bread recipe complete with tips for novices is just everything delicious!
Servings: 12 people
Ingredients
- 2 cups scalded milk 2%
- 4 tablespoons sugar
- 2 tablespoons shortening
- 1 ½ teaspoons salt
- 1¼ teaspoons active dry yeast aka 1 yeast cake
- ½ cup warm water
- 5 cups whole-wheat flour
Instructions
- Scald ALL LIQUIDS to ensure the destruction of micro-organisms that might interfere with the action of the yeast plant.
- ADD FAT SUGAR AND SALT to the hot liquid and let it cool until it is lukewarm.
- ADD THE YEAST CAKE, softened in a small amount of water to which one teaspoon of sugar may be added.
- ADD THE FLOUR. Whole-wheat flour should not be sifted before measuring. I then set my Kitchen Aid mixer with the bread hook attachment on speed 2 and let it work it’s magic until the dough clung to the hook and cleaned the sides of the bowl, about two minutes. Then knead on speed 2 for an additional two minutes.
- If you are doing the kneading by hand, Ruth Berolzheimer explains, “Press the dough away with the palms of your hand. Stretch the dough from the edge, folding back edge over to the center. Press the dough away with the palms of your hands, exerting sufficient force to cause the part folded over to adhere to the mass under it, and repeat folding. Turn dough one-quarter around and repeat kneading. Continue turning, folding, and kneading until the dough is smooth and elastic and will not stick to an unfloured board.”
- FIRST RISING – Grease a large bowl with vegetable oil. I pour a little oil in my hands and then spread the oil over the insides of the bowl with my hands like fingerpainting. I find this more efficient and rather fun! Place dough in the bowl and turn the dough in the bowl to cover all sides of the dough with oil. Cover with a damp towel and place in a warm place (80 ° – 85°) for an hour, or until the dough is triple its size. There is no warm place in my condo at this time of year, so I preheated the oven for 10 minutes and then let it cool down to a comfortable temperature. An oven thermometer would be very helpful here.
- SECOND RISING – Let the dough rise for another hour.
- SHAPING THE LOAVES – Separate the dough into two halves. Woman’s Cookbook says to fold the sides underneath the loaf and squeeze to elongate the dough to the size of your pan. I decided to make one large loaf and two baby loaves, so I divided one half into half again. Place the shaped dough into well-greased pans. Let rise until doubled in volume.
- Cook loaves at 400° for 15 minutes and then decrease the temperature to 350° for the remaining 45 minutes. My mini loaves were done after an additional 15 minutes at 350°. The loaves are done when the sides pull away from the pan, the crust is a rich, golden brown, and the loaves sound hollow when you firmly tap the top. You can also insert a toothpick into the center; the loaves are done when it comes out clean. Immediately remove the loaves from the pans to cool on a rack.
Notes
Adapted from 1939's American Women's Cookbook.
While Pasteur thinks it irrelevant, it is best to warm the liquids at the beginning so the other steps work.
When I first tried this, I was impatient, so I placed my mixer bowl in a larger bowl filled with cold but not icy water and stirred until the mixture reached a temperature of 100 ° – 110° F.
It should be known that Google told me that 1 yeast cake = 1 packet of dried active yeast. I added ¼ cup of warm water (100 ° – 110° F) to the yeast and stirred to mix. Then added 1 t of sugar to proof the yeast. Wait 10 minutes, and if the mixture has tripled in size, then the yeast is healthy & ready to use.
This second rising is optional, but as Ruth explains, “This second rising is… worthwhile because it improves both the texture and flavor of the bread.” I took my bowl from the oven quickly to avoid too much heat escaping, folded the top of the dough over the sides, and tucked them under the loaf per the Woman’s Cookbook’s instructions. Next time I will just punch down the loaf. I felt folding it over made the top of the loaf rough. It could also be that I did it wrong the first time I tried this.
Nutrition
Serving: 83g | Calories: 228kcal | Carbohydrates: 42g | Protein: 8g | Fat: 4g | Saturated Fat: 1g | Polyunsaturated Fat: 1g | Monounsaturated Fat: 1g | Trans Fat: 1g | Cholesterol: 3mg | Sodium: 311mg | Potassium: 249mg | Fiber: 6g | Sugar: 6g | Vitamin A: 45IU | Vitamin C: 1mg | Calcium: 65mg | Iron: 2mg