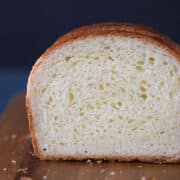
Brioche Bread
This buttery Brioche Bread recipe is so soft and tender it melts in your mouth! A rich, flavorful bread perfect for snacking, sandwiches, French toast or bread puddings!
Servings: 24 Slices
Ingredients
- 490 g All purpose flour
- 108 g Water
- 63 g Milk
- 10 g Kosher Salt
- 10 g Dry Active Yeast
- 100 g Eggs
- 59 g Sugar
- 157 g Butter cold but pliable
Makes: 9 x 5inch rectangle
Instructions
Make the Sponge:
- In the bowl of a stand mixer add the warm water and sprinkle the yeast on top and allow to sit until bubbly, approximately 10-20 minutes depending on the heat of your room.
Mix the Dough:
- Add all the remaining ingredients to the bowl (yes all!) and mix to incorporate with the PADDLE attachment. I find the paddle is more efficient incorporating that the hook in most home stand mixers. Once the ingredients are mixed and the flour has been hydrated, switch to the hook attachment and mix on medium until a smooth dough forms. Use the window pane test to tell if the dough is ready to proof.
- WINDOW PANE TEST: take a golf ball sized portion of the dough from the mixer and gently start to pull the dough apart. I like to think of it as a square and gently pull on two sides, then rotate and repeat. If the dough tears instantly, it is definitely not ready. If it allows you to pull it thin enough to see light through it, then it is ready. There are different degrees of gluten development but with this dough we want to develop a strong gluten network to hold up to all that butter and eggs! Since we are mixing the butter in with the rest of the ingredients, it will inhibit the creation of the gluten network. In a larger batch this should be added after gluten development; however, in this case it is almost impossible to get a home stand mixer to incorporate this quantity of butter. So don’t stress about the perfect window pane. That is why we will do a series of folds to finish developing the gluten.
- Place the dough in a lightly oiled bowl, cover with plastic wrap and then place in a warm spot. Allow to proof 30 minutes. Give the dough one set of folds.
- Set of folds: Fold each of the four sides into the center, pulling the dough up and allowing it to smack down on top of the remaining dough in the bowl. This is developing more gluten!
Bulk Proof:
- Cover the dough and place back into the warm spot to proof. Check the dough every 45 minutes. This will take about 1 hours. You want to oil or flour your hand and feel the dough. It should feel light and airy and not stiff or dense.
- Remove the dough from the bowl and divide in half. This will make two loaves weighing 500g each.
Pre-Shape:
- Turn the dough out onto a lightly (I mean lightly!) floured surface. Fold each of the four sides towards you into the center, turning the dough after each fold. This will create a little packet. Flip the dough so the seam in on the counter. Shape it into a round by using both hands to pull the dough towards you. Once you have a round ball with a smooth top, allow it to sit and bench rest for 15 minutes.
Final Shape:
- It is time to final shape! We are going to shape these into a log (or a bâtard if you like fancy French terms for things). Take one of the rounds and flip it over. Grab the top and bottom edges and gently pull it into a small rectangle. Place it on the counter and fold the top edge down 2/3rd of the way and press it into the dough. Rotate so that the unfolded edge is now away from you and fold that edge down towards you to meet the bottom edge. Press to seal. Now we are going to do 2 thumb folds. Take the top edge with your right hand and fold it over you thumb about half way down, pressing to seal as you go. Repeat until you have folded the entire length. You will notice the dough getting tighter and also longer. Keep in mind the length of your pan. You don’t want your dough to be longer than your pan. You can put it on the counter above you dough for reference if that makes it easier to judge the length. Repeat the thumb fold once more, sealing really well on the bottom. You should now have a log shape that is even in width along the whole length, that is the length of your pan, and tight enough to not slouch onto the counter. If the dough is too loose, repeat the thumb fold once more.
- Place each log into the sprayed pan seam-side down. Cover with plastic wrap and place once more in your warm spot.
Final Proof:
- Allow to proof until the dough just starts to reach the top of the pan. When that happens preheat your oven to 350°F. As soon as it is preheated bake for 35-40 minutes or until the internal temperature reads 185°F.
- Allow to cool 5 minutes in the pan then remove to a rack to cool completely. If they sit in the pan too long, they will steam and the sides and bottom will get soggy!
- Slice and enjoy!
Video
Notes
To Freeze: Pre-slice, wrap VERY well in plastic wrap, place in gallon zip-top baggy and freeze. Remove as many slices as desired and toast (or microwave).
I find that two loaves mixes better in home mixers, so I always make two at a time and freeze one. You can halve this recipe and make one loaf, but it might be difficult to develop the gluten in most stand mixers.
I find that two loaves mixes better in home mixers, so I always make two at a time and freeze one. You can halve this recipe and make one loaf, but it might be difficult to develop the gluten in most stand mixers.
Nutrition
Calories: 140kcal | Carbohydrates: 18g | Protein: 3g | Fat: 6g | Saturated Fat: 4g | Polyunsaturated Fat: 0.4g | Monounsaturated Fat: 2g | Trans Fat: 0.2g | Cholesterol: 30mg | Sodium: 211mg | Potassium: 37mg | Fiber: 1g | Sugar: 3g | Vitamin A: 190IU | Vitamin C: 0.001mg | Calcium: 11mg | Iron: 1mg