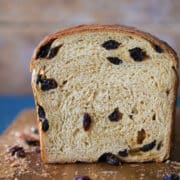
Raisin Bread
This raisin bread recipe is soft, chewy, and moist with just a hint of molasses flavor. Enjoy this bread by the slice, as cinnamon sugar toast or as delicious French toast!
Servings: 24 slices
Ingredients
- 2 cups whole milk warmed to 115°F
- 2 tbsp shortening
- ¼ cup molasses
- 2 ¼ teaspoon dry active yeast
- 6 cups all-purpose flour
- 1 ½ teaspoon kosher salt
- ¾ cup raisins
Makes: 5 x 5inch rectangle
Instructions
Mix the dough:
- Combine the shortening, molasses, and milk and heat until all the shortening has melted, stirring occasionally. Let this mixture cool until it is lukewarm (100°F – 110°F).
- Whisk the active dry yeast into the mixture and let it sit, undisturbed, for 10-15 minutes, or until the yeast has bubbled and looks frothy.
- In the bowl of a stand mixer fitted with the paddle attachment, combine wet ingredients with salt and flour. Mix on low until incorporated.
- Switch to the dough hook attachment and mix on medium until a smooth dough has formed and it passes the windowpane test. It took about 10-12 minutes in my stand mixer.
- Once the desired amount of gluten development has occurred, add the raisins and mix on low. Make sure to give the raisins enough time to work all the way throughout the dough.
Bulk proof:
- Oil a large bowl with cooking spray or vegetable oil. Place the dough in the greased bowl. Cover with a damp towel or plastic wrap.
- Allow to proof in a warm spot until doubled, which took me an hour.
- Turn dough out onto a countertop and divide into two equal portions (730g).
Shape the bread:
- Preheat the oven to 350°F and spray two 9×5-inch loaf pans with cooking spray or butter.
- Preshape the dough into a boule (round). Fold each of the four sides towards the center, then flip over (seam side down). Gently pull it towards yourself using two hands, allowing the dough to stretch over the top and pull underneath. Turn a quarter turn and repeat until you have a round dough ball with a smooth, tight surface. Cover with plastic wrap. Bench rest (allow to sit undisturbed) 10 minutes.
- Final shape into a log and place in a greased baking dish. Flip the dough over so the seam is facing up. Grab two corners, pick it up, and allow gravity to pull the dough down, stretching it into a rectangle. Place on the bench (seam still face up). Fold the top third towards the center, pressing down. Rotate 180 degrees, then repeat with the other side. Folding the top third down towards the center. Using the heel of your right hand and the thumb on your left, grab the top part of the dough starting on the right side and fold it over your thumb. Seal it down by pressing the heel of your right hand on the seam you just created. Repeat until you have gone the full length of the loaf.
- Place seam-side down in the prepared loaf pans. Cover with plastic wrap.
Final Proof and Bake:
- Proof in a warm, humid place until they have doubled in size and feel light and airy to touch.
- Bake in the preheated oven until a thermometer reads 186°F. You can also insert a toothpick into the center; the loaves are done when it comes out clean. Turn out onto a cooling rack and cool completely before slicing.
Notes
Yield – 2 loaves
Presentation – For a shiny top, brush the bread with egg wash before baking.
Flavor Tips – Usually, raisins don’t last long in my house, but if your raisins are on the older side, check them and make sure they still taste fresh. You don’t want to make the bread and then find out your raisins have an off taste.
Storage – Store well-wrapped or in an airtight container at room temperature for up to 5 days, or freeze immediately after cooling for up to 2 months. The refrigerator will dry out the bread faster. I find it easier to pre-slice before wrapping and freezing.
Nutrition
Calories: 163kcal | Carbohydrates: 31g | Protein: 4g | Fat: 2g | Saturated Fat: 1g | Polyunsaturated Fat: 1g | Monounsaturated Fat: 1g | Trans Fat: 1g | Cholesterol: 2mg | Sodium: 157mg | Potassium: 163mg | Fiber: 1g | Sugar: 4g | Vitamin A: 33IU | Vitamin C: 1mg | Calcium: 39mg | Iron: 2mg