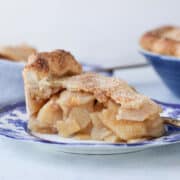
Mile High Apple Pie
This mile high apple pie has 5 pounds of apples baked inside a buttery, flaky pie crust. Pre-cooked filling eliminates the dreaded gap between the crust and the apples and adds layers of caramelized flavor you can't get any other way.
Servings: 12 slices
Ingredients
For the All-Butter Pie Crust (you could also use 2 store-bought crusts instead):
- 2 ¼ cups pastry flour measured by fluffing the flour then spooning it in
- 1 teaspoon kosher salt
- 1 teaspoon sugar
- 9 tablespoons unsalted butter cold, cubed into ½ inch cubes
- 2 ¼ oz cold water or as much or as little as needed
For the Pie Filling:
- 11 cups apples peeled, cored and cut into ¼ inch slices. From 5 lbs of whole apples
- 2 tablespoons lemon juice freshly squeezed from about 1 lemon
- 1 lemon juiced and zested (bright yellow parts only!)
- 1 teaspoon cinnamon
- ¾ cup light brown sugar
- ¾ cup granulated sugar
- ¼ cup cornstarch
- 2 tablespoons butter cubed
- Heavy cream & granulated sugar for sprinkling
Instructions
Prepare the Pie Crusts:
- Combine the pastry flour, salt, and sugar together in the bowl of your stand mixer.
- Using your stand mixer with a paddle attachment, cut in the butter until you have slightly larger than pea-sized pieces.
- Slowly add your ice water, a tablespoon at a time.
- When a shaggy dough has formed and there is still some loose flour, turn it out onto your work surface and work it together. Do this by gathering it and pressing away from you with the heel of your hand. Do this JUST until it comes together. If it is crumbling, then dip your hand in a bit of ice water and pat it on the pastry dough. Seriously, that’s it. Remember the gluten!
- Divide the dough in half and press each half into a disk. Wrap in plastic wrap and chill for 2 hours or overnight. If you chill your dough overnight, you will need to let it rest a bit before rolling, or it will be too cold and it will crack.
Prepare the Filling:
- Freeze two rimmed baking sheets.
- Peel, core, and quarter apples. Slice about ¼ inch thick either by hand or with a mandolin. The mandolin will speed up the process and also make more consistent slices.
- Combine apples, lemon juice, lemon zest, cinnamon, sugars, cornstarch and butter in a large pot.
- Simmer over low heat until the apples begin to release their juices. Increase the heat to medium and cook until the filling has thickened and the apples are crisp-tender.
- Pour the filling between two frozen baking sheets lined with parchment paper. The filling should be in a single layer. Cover with plastic and poke a few ventilation holes. Refrigerate until cold. This rapidly cools the filling and stops the cooking process.
Mile High Apple Pie Assembly:
- Preheat the oven to 375°F convection ( 400°F conventional).
- Roll out your pie crusts on a lightly floured surface into two circles that are roughly 2 inches larger in diameter than your dish, to a little more than ⅛th of an inch thick.
- Line an ungreased pie dish with one of the crusts, allowing the excess to hang over the edges. Place on a sheet pan, cover, and chill.
- Place the top crust on a parchment-lined sheet pan, cover with plastic, and chill until ready to use.
- Pour cooled apple filling into the pastry-lined pie dish, mounding the apples in the center. Place the top crust over the filling; trim all but ½ inch excess dough from around the edges; press the top and bottom crust together, fold under, and create a decorative edge. You can flute the edges or press with a fork, or even decorate with cutouts from your scraps.
- Cut vent holes on top (you can also make cute cutouts before placing the top crust over the filling).
- Brush the top crust with heavy cream, then generously sprinkle with granulated or turbinado sugar.
- Bake in preheated oven for 15 minutes, then lower the temperature to 350℉ and bake until the filling is bubbling and the crust is brown, which will be about 45-60 minutes longer.
- Allow the pie to chill for at least 2 hours before slicing. Serve at room temperature or warmed.
Video
Notes
Yield – 1 9-inch pie
Presentation – The pie will slice best when cold; you can pre-slice and warm it in the oven.
Flavor Tips – I use a variety of apples to vary the flavor and sweetness. Choose between Honeycrisp, Braeburn, Jonagold, Cortland, Cripps Pink, Gala, Granny Smith, and Pink Lady.
Technique – You don't have to precook the apples for this apple pie, but precooking the filling will prevent underdone filling and an overbaked crust.
Storage – Store baked and cooled pie at room temperature for 3 days, refrigerated for 1 week, or in the freezer for up to 2 months.
Nutrition
Calories: 343kcal | Carbohydrates: 62g | Protein: 4g | Fat: 11g | Saturated Fat: 7g | Polyunsaturated Fat: 1g | Monounsaturated Fat: 3g | Trans Fat: 0.4g | Cholesterol: 28mg | Sodium: 216mg | Potassium: 242mg | Fiber: 6g | Sugar: 38g | Vitamin A: 387IU | Vitamin C: 11mg | Calcium: 34mg | Iron: 1mg