This post may contain affiliate links. Please read our disclosure policy.
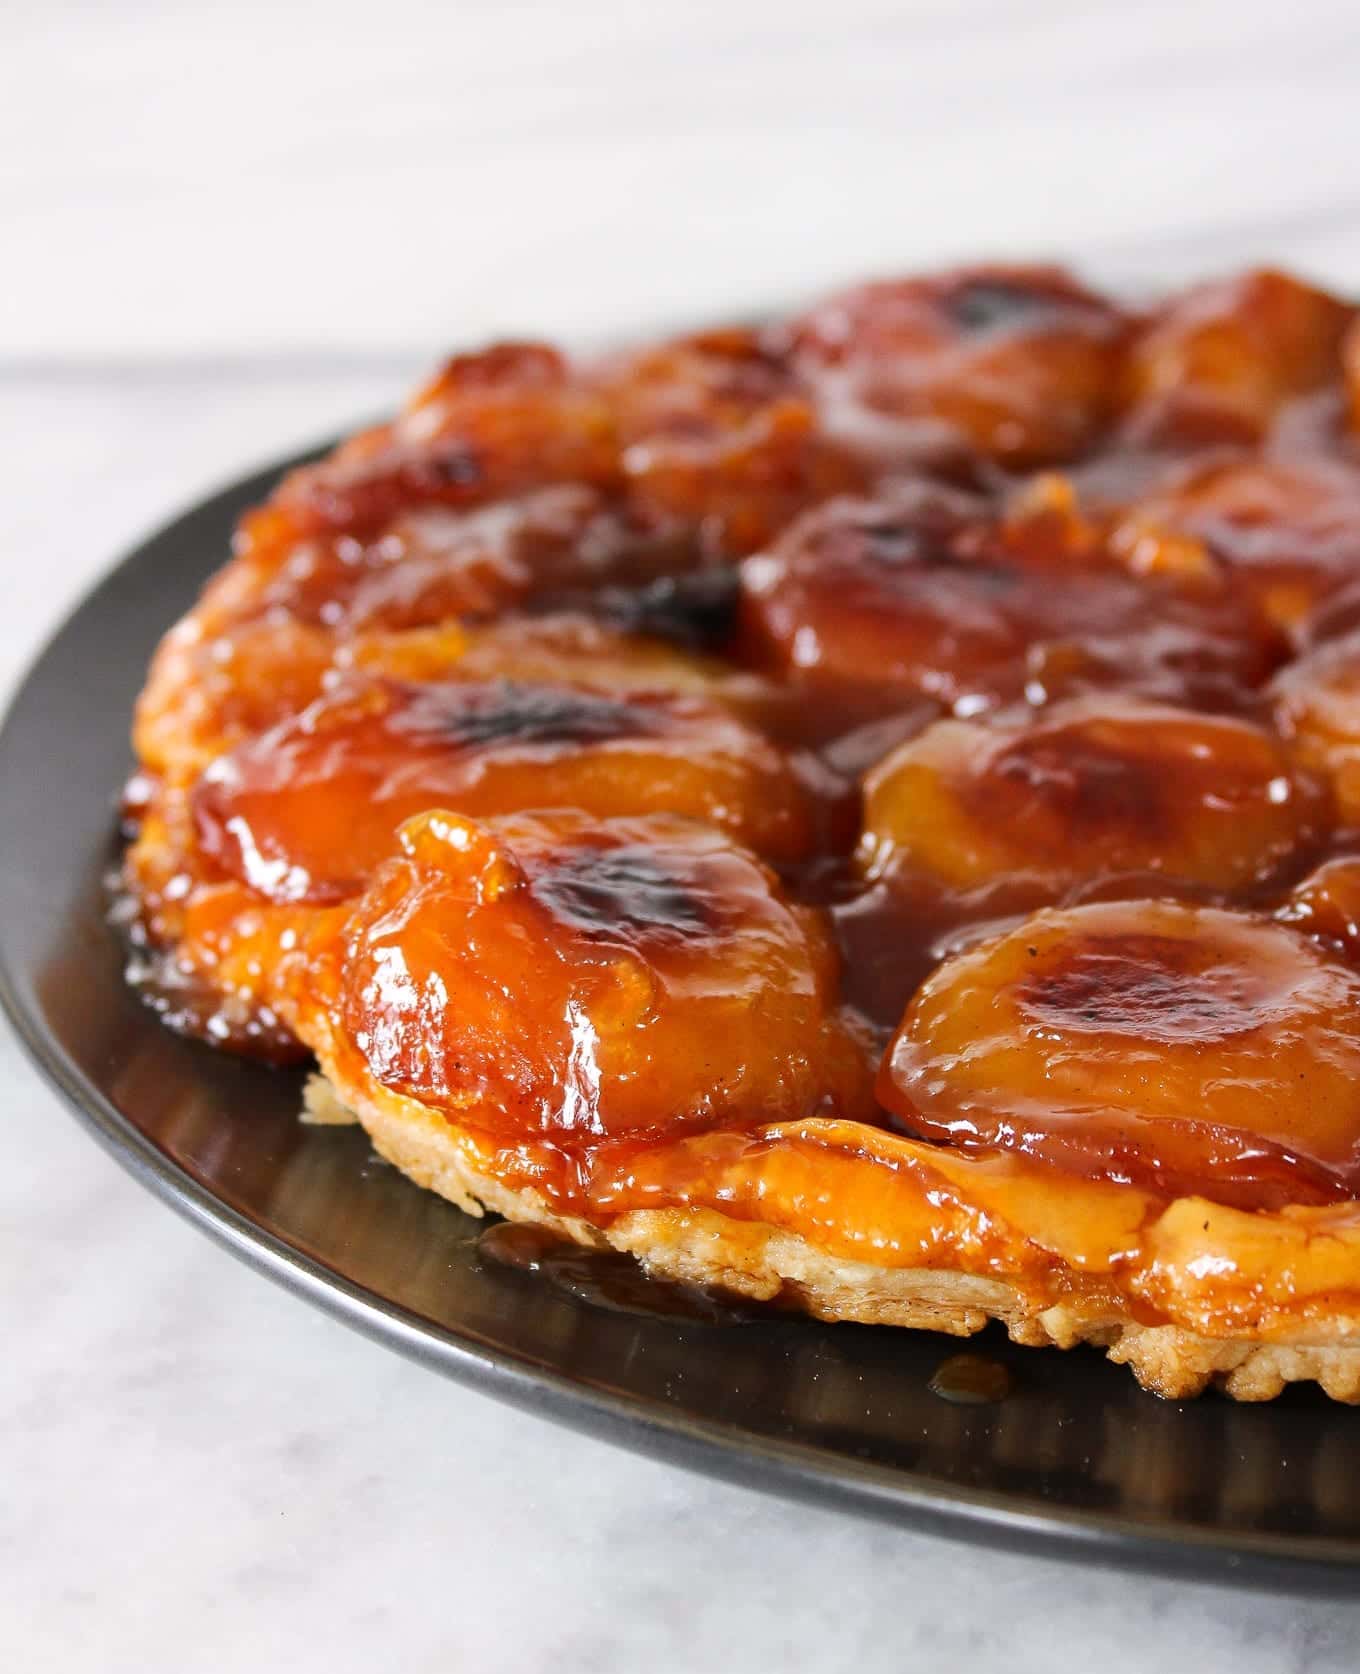
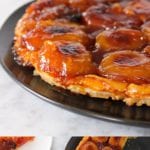
Apple tarte tatin is one of those recipes that looks impressive and tastes even better than it looks. Deep caramel, tender apples, and shatteringly crisp pastry come together in one pan in under an hour.

A Quick Look At The Recipe
This is a brief summary of the recipe. Jump to the recipe to get the full details.
Jump to RecipePrep Time
15 minutes
Cook Time
25 minutes
Resting
10 minutes
Total Time
50 minutes
Servings
12 servings
Difficulty
Intermediate — stovetop caramelization and a flambée step require attention, but the technique is straightforward once you understand the stages.
Calories *
97 kcal per serving
Technique
Stovetop caramelization with flambée; apples arranged and cooked directly in the caramel; puff pastry laid over and baked until golden, then inverted to serve.
Flavor Profile
Deep caramel, tart apple, rich butter, subtle spice.
* Based on nutrition panel
I was nervous about the flambée step, but your instructions made it completely manageable. The caramel turned out deep and rich, and when I flipped the tart onto the plate it came out perfectly. My family thought I had spent all day on it. ⭐⭐⭐⭐⭐
Beth
Why This Recipe Works
- Stovetop caramelization gives you full control. Cooking the caramel on the stovetop, in the same pan you bake in, lets you monitor color and heat directly. You can take it exactly to medium amber, which is the depth that makes this tarte tatin something more than just sweet.
- The flambée adds flavor, not just theater. Flambéeing the caramel and apples drives off the harsh alcohol and leaves behind a rounded flavor that a standard caramel cannot replicate. The step is optional, but it earns its place.
- One pan, start to finish. The caramel, the apples, and the bake all happen in a single cast-iron or heavy-bottomed skillet. There is nothing to transfer, no extra vessel to clean, and the skillet distributes heat evenly for a more consistent caramel across the bottom of the tart. If you want more inspiration for this kind of approach, best apple dessert recipes has a full collection worth bookmarking.
- Works with store-bought or homemade puff pastry. A good all-butter store-bought sheet produces a genuinely flaky result. If you want to go further, classic puff pastry or inverse puff pastry can be made ahead and frozen in sheets, which is exactly what I do when I want to impress without the day-of pressure.
Table of Contents
Tarte Tatin is one of those recipes I return to every fall because it delivers an enormous amount of flavor with relatively little effort. The flambée and the inversion feel dramatic, but the technique itself is straightforward once you understand what to look for at each stage.
If you love the combination of caramel and apple in a pastry format, my Caramel Apple Tart takes that pairing in a completely different direction with a cinnamon streusel topping. Both are worth having in your repertoire, and they are different enough that choosing between them comes down to the occasion.
Ingredients & Substitutions
- Apples: The apples are the structure of this tart, so they need to hold their shape through a long, high-heat caramel cook and a full oven bake. Choose a firm, moderately tart variety of similar size: Honeycrisp, Gala, Crispin, Crimson Crisp, or Ginger Gold all work well. Avoid Macintosh and other varieties that turn mealy under heat. If you love apples in pastry, my Easy Apple Pie uses a completely different preparation and is worth having alongside this one.
- Unsalted butter: Butter combines with the sugar to form the base caramel and gives the finished tart its glossy, silky texture. Use unsalted so you can control the seasoning precisely, and cut it into even pieces so it melts uniformly without scorching.
- Sugar: This is the backbone of the tarte Tatin. Sugar caramelizes directly in the pan to create the signature bittersweet amber sauce that coats the apples and soaks into the pastry as it bakes. Do not reduce the quantity: a thin caramel will not set properly when the tart is inverted.
- Kosher salt
- Ground cinnamon: Cinnamon adds a warm note that complements the apples without overwhelming the caramel. Keep it to a light sprinkle so it perfumes the filling rather than turning it into a spiced apple dessert. If you want to go further, Apple Pie Spice blended into the dough itself is a lovely variation.
- Apple brandy (optional): Apple brandy deepens the fruitiness and adds a brightness that cuts through the caramel’s richness. Add it during the flambée step, or briefly reduce it to drive off the raw alcohol. Too much liquid or insufficient reduction can prevent the caramel from thickening properly.
- Cold puff pastry (classic or inverse): Puff pastry bakes into crisp, flaky layers that contrast with the soft fruit and sticky caramel below. It must go into the oven very cold so the butter layers stay defined and puff correctly. Inverse puff gives an especially shattery, delicate texture; classic puff is slightly sturdier and easier to handle. Both can be made ahead and frozen in sheets, which is exactly what I do when I want to get ahead of the day. Or you can use store-bought!
See the recipe card for full information on ingredients and quantities.
Variations on This Apple Tarte Tatin
- Use homemade puff pastry. Both my inverse puff pastry and classic puff pastry can be made ahead and frozen in sheets, which is exactly what I do when I want to get ahead. Inverse puff gives a particularly shattery, delicate result that pairs beautifully with the soft caramelized apples.
- Try it with pears or a different firm fruit. If apples are not available or you want a change, pears work on the same principle: choose a firm variety that holds its shape under heat. For a different take on the upside-down format, my pear upside down cake and orange upside down cake both use similar logic with a cake base instead of pastry. If you are in the mood for a simpler apple dessert, my best apple cobbler recipe is a great back-pocket option.
- Add some honey or maple to the caramel. Swap a small amount of sugar for honey or maple syrup for more depth of flavor.
Professional Tips
- Take the caramel to a medium amber. A pale caramel tastes only of sugar; the bitterness and complexity that make tarte tatin distinctive develop in the darker range. Pull it before it smells acrid, but do not rush it off the heat too early.
- Cool the apples completely before adding puff pastry. Laying cold puff onto hot apples softens the butter layers before they ever reach the oven, and the pastry will bake up dense instead of flaky. Wait until the filling is at room temperature, which is the single step most people skip.
- Keep the puff pastry cold right up until it goes on. Return it to the refrigerator if it has been sitting out while the apples cool. Cold fat in the dough is what creates the separation between layers, and any softening before the oven works against that.
- Rest the tart for 10 minutes before inverting, then cut while it is still hot. Flipping too soon sends caramel running across the plate. After resting, the caramel firms just enough to hold the apples in place. Slicing while the tart is still warm gives you cleaner cuts than slicing cold.
How to Make Apple Tarte Tatin
Use these instructions to make the perfect apple tarte tatin every time! Further details and measurements can be found in the recipe card below.
Step 1: Prep the apples. Peel and core all the apples, then slice each one in half from top to bottom, not around the circumference. Cut each half in half again so you have quarters. This shape lets you pack more apples into the pan, which matters because they will shrink as they cook, and you do not want bare spots in your finished tart.
Step 2: Arrange the apples in the pan. Melt the butter in an 8 to 10 inch heavy-bottomed skillet over medium heat. Arrange the apple quarters with the rounded side facing down, crowding them tightly to cover the entire bottom of the pan. They should be snug.
A cast-iron skillet gives you the most even caramelization and a cleaner-looking tart, but any heavy-bottomed skillet works well.
Step 3: Add the sugar and begin the caramel. Pour the sugar evenly over the apples, then add a pinch of kosher salt and the cinnamon, if using. Set the pan over medium heat and let the sugar melt and begin to caramelize. Swirl the pan gently as needed and rotate it to ensure the caramel colors evenly throughout. You are looking for a medium amber color, which is deeper than pale gold.
In a dark cast iron, it can be hard to see the color of your caramel. Use a spoon and check the color.
Step 4: Flambée the apples. Add the alcohol directly over the caramelized apples. Using a gas burner, kitchen torch, or lighter, carefully ignite it and allow the flame to burn off completely. When there is no more flame, there is no more alcohol. The flambée is not strictly required, but it adds a real depth of flavor that a dry caramel alone does not quite replicate, which I love. If you prefer, you can skip this step and simply carry a dry caramel all the way through.
Step 5: Cool the apples completely. Remove the pan from the heat and let it cool for about 15-20 minutes before adding the puff pastry.
This step is non-negotiable. Placing cold puff pastry on hot caramel will melt the butter in the dough before it ever reaches the oven, and you will lose the layers that give puff pastry its lift and flake. Be patient here and the puff will reward you.
Step 6: Preheat the oven and cut the puff pastry. Preheat your oven to 375°F conventional. Cut the puff pastry sheet so it is just slightly larger than your pan. Keep the dough cold right up until you place it. If it has warmed while you wait for the apples to cool, slide it back into the fridge for 10 to 15 minutes before you proceed. Cold dough is the whole game here.
Step 7: Top the tart with puff pastry. Lay the cold puff pastry over the cooled apples, tucking and rolling in any edges that extend past the rim of the pan. You want a snug fit so the pastry stays in contact with the apples as it bakes and the caramel does not bubble up over the sides.
Step 8: Bake until puffed and deep golden brown. Slide the pan into the preheated oven and bake for 20 to 30 minutes. The pastry is done when it is fully puffed and a deep, even golden brown across the entire surface. Start checking at 20 minutes. Pale pastry means underbaked layers that will compress when you flip the tart, so give it the full time it needs.
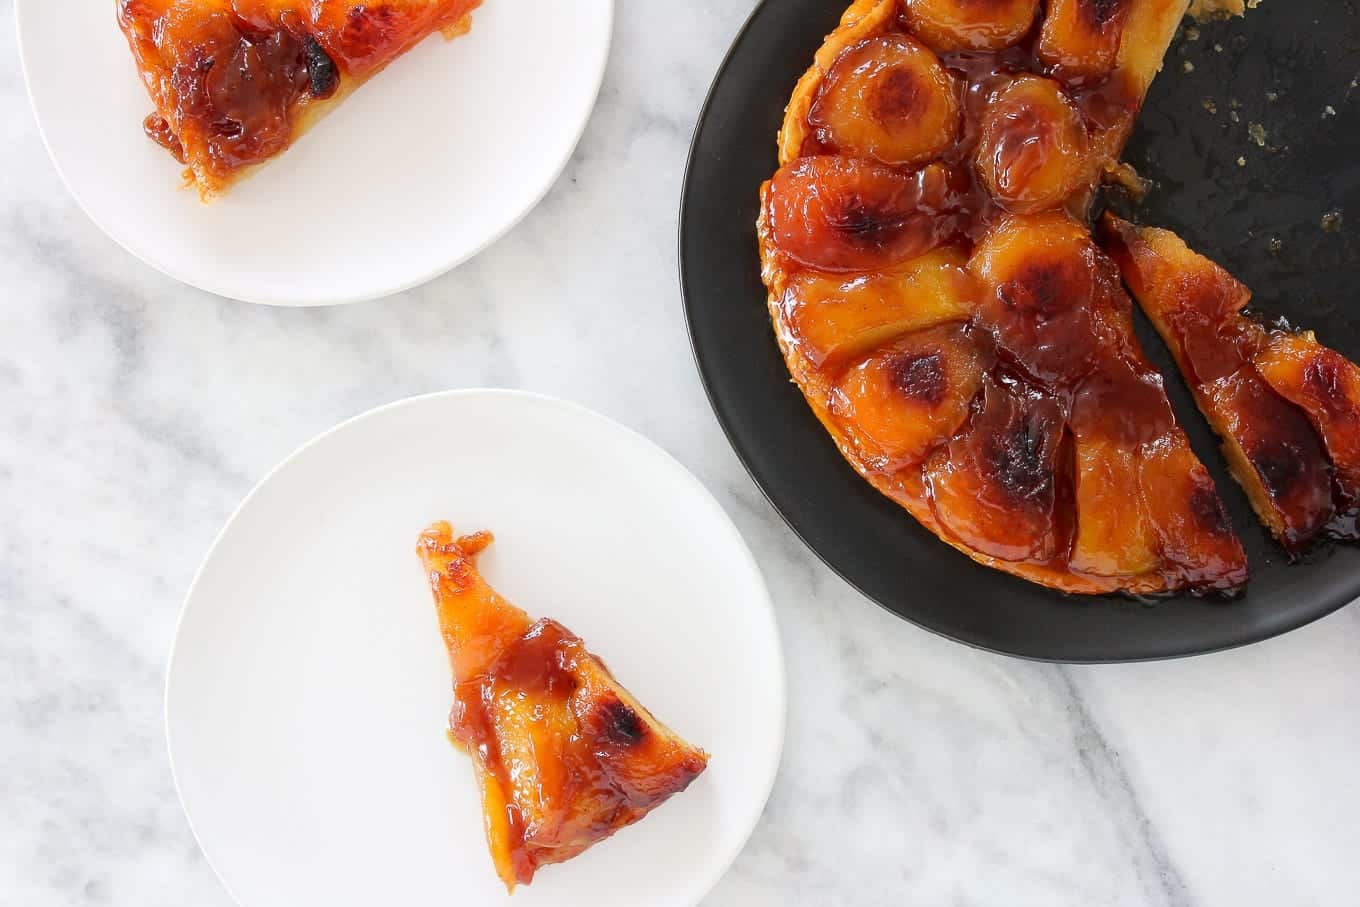
Step 9: Rest, then invert onto a plate. Remove the pan from the oven and let the tart rest in the pan for about 10 minutes. This brief rest lets the caramel firm up slightly so it does not run when you flip. Place a large plate or serving dish firmly over the top of the pan, then invert in one confident motion. If any apples shift, press them gently back into place while the caramel is still warm and pliable.
Step 10: Slice and serve. The tart cuts most cleanly while it is still warm, so I usually slice mine right away with a sharp knife before bringing it to the table. Serve it the day it is made for the best puff pastry texture. A mound of vanilla bean ice cream or a generous spoonful of creme anglaise alongside is, in my opinion, not optional.
Chef Lindsey’s Recipe Tip
The single most common reason a tarte tatin disappoints is an underdeveloped caramel. It is tempting to pull it off the heat the moment it turns golden, but a pale caramel tastes flat against the apples and disappears into sweetness rather than adding depth. Push it to a true medium amber, watch the color shift, and smell for that slightly bitter, nutty edge; the rest of the recipe will take care of itself. Everything else here is forgiving; the caramel is where this tart is made or lost.
Recipe FAQs
Choose a firm, moderately tart apple that holds its shape through both the stovetop caramel cook and the oven bake. Honeycrisp, Gala, Crispin, Crimson Crisp, and Ginger Gold all work well. Avoid Macintosh and similarly soft varieties, which turn mealy under prolonged heat and collapse into the caramel rather than holding their structure.
The caramel is ready when it reaches a medium amber color. The caramel will continue to cook in the oven, so like an upside down cake, do not take the caramel too far. A pale or golden caramel has not developed enough complexity and will taste only sweet once baked. Pull it before it smells acrid or begins to smoke, but do not rush it off the heat early.
Tarte tatin is genuinely best the day it is made, while the pastry is still shatteringly crisp. That said, you can store a cooled tarte tatin in an airtight container or tightly wrapped in the refrigerator for up to 3 days. The puff pastry will soften over time, but the flavor holds.
Rest the tart in the pan for 10 minutes after pulling it from the oven before inverting it onto a large plate or serving dish. Flipping too soon sends caramel running out across the plate before it has had a chance to firm slightly. Once inverted, slice while the tart is still warm for the cleanest cuts.
Recommended Apple Recipes!
Cookie Recipes
Apple Pie Cookies
Apple Recipes
Applesauce Recipe – 2 ingredients!
Cake Recipes
Applesauce Cake
Crisps & Crumble Recipes
Easy Apple Cobbler Recipe
If you tried this recipe and loved it please leave a 🌟 star rating and let me know how it goes in the comments below. I love hearing from you; your comments make my day!
Apple Tarte Tatin
Ingredients
- 3 ⅕ tablespoons unsalted butter
- 1 cup sugar
- 1 pinch kosher salt
- 1 pinch ground cinnamon optional
- 2 tablespoons apple brandy optional
- 1 sheet cold puff pastry classic or inverse puff pastry
Instructions
- Peel, core, and quarter all apples from top to bottom.
- Melt the butter in an 8 to 10 inch heavy-bottomed skillet over medium heat. Arrange the apple quarters round-side down, crowding them to cover the entire bottom of the pan.
- Pour the sugar evenly over the apples. Add the kosher salt and cinnamon if using.
- Cook over medium heat, swirling the pan as needed, until the caramel reaches a medium amber. Rotate the pan for even color. Be careful not to over or under-develop the caramel.
- If using, add the apple brandy to the pan and carefully ignite using a gas burner, kitchen torch, or lighter. Allow the flame to burn out completely before proceeding.
- Remove from heat and cool to room temperature for 15-20 minutes.
- Preheat the oven to 375°F conventional.
- Cut the puff pastry into a circle just slightly larger than the pan. Lay it over the apples, tucking in any overhanging edges.
- Bake for 20 to 30 minutes, until the puff pastry is fully puffed and deep golden brown.
- Cool in the pan for 10 minutes, then carefully invert onto a large plate or serving dish. Slice while still warm for the cleanest cuts.
Video
Notes
Flipping: Rest the tart in the pan for the full 10 minutes before inverting. Flipping too soon allows the caramel to run before it has had a chance to firm slightly.
Storage: Store cooled tarte tatin in an airtight container or tightly wrapped in the refrigerator for up to 3 days. The puff pastry will soften over time, but the flavor holds. Best served the day it is made.
Nutrition
Before You Go
If this caramelized apple tart finds a permanent spot in your rotation, I think you are going to keep coming back to it. Browse more of my Pie & Tart Recipes or go in a creamy direction and make this crème caramel next!


I was nervous about the flambée step, but your instructions made it completely manageable. The caramel turned out deep and rich, and when I flipped the tart onto the plate it came out perfectly. My family thought I had spent all day on it.
I made this for a dinner party where everyone pretends they don’t care about dessert but absolutely does. The skillet-only method kept everything contained and low-stress. Letting the caramel go to a true medium amber like you said made all the difference. I felt extremely accomplished flipping it out!
I just made this for myself and my husband – a little treat for us since we just bought a house in France and have been working on the renovation every day. This recipe is THE BEST! So easy to make and oh so delicious. Thanks for the tips on which apples to use. Very helpful.
Hi Vivianne! Thank you so much, that makes my day! I love that you shared it with your husband! I’m so happy the tips were useful for you, and thanks for taking a moment to come back and rate/comment. Happy baking!
I made this for a dinner party where everyone pretends they don’t care about dessert but absolutely does. The skillet-only method kept everything contained and low-stress. To be totally frank, I felt extremely accomplished serving this and I think everyone really liked it, my friend even texted me the next morning!