This post may contain affiliate links. Please read our disclosure policy.
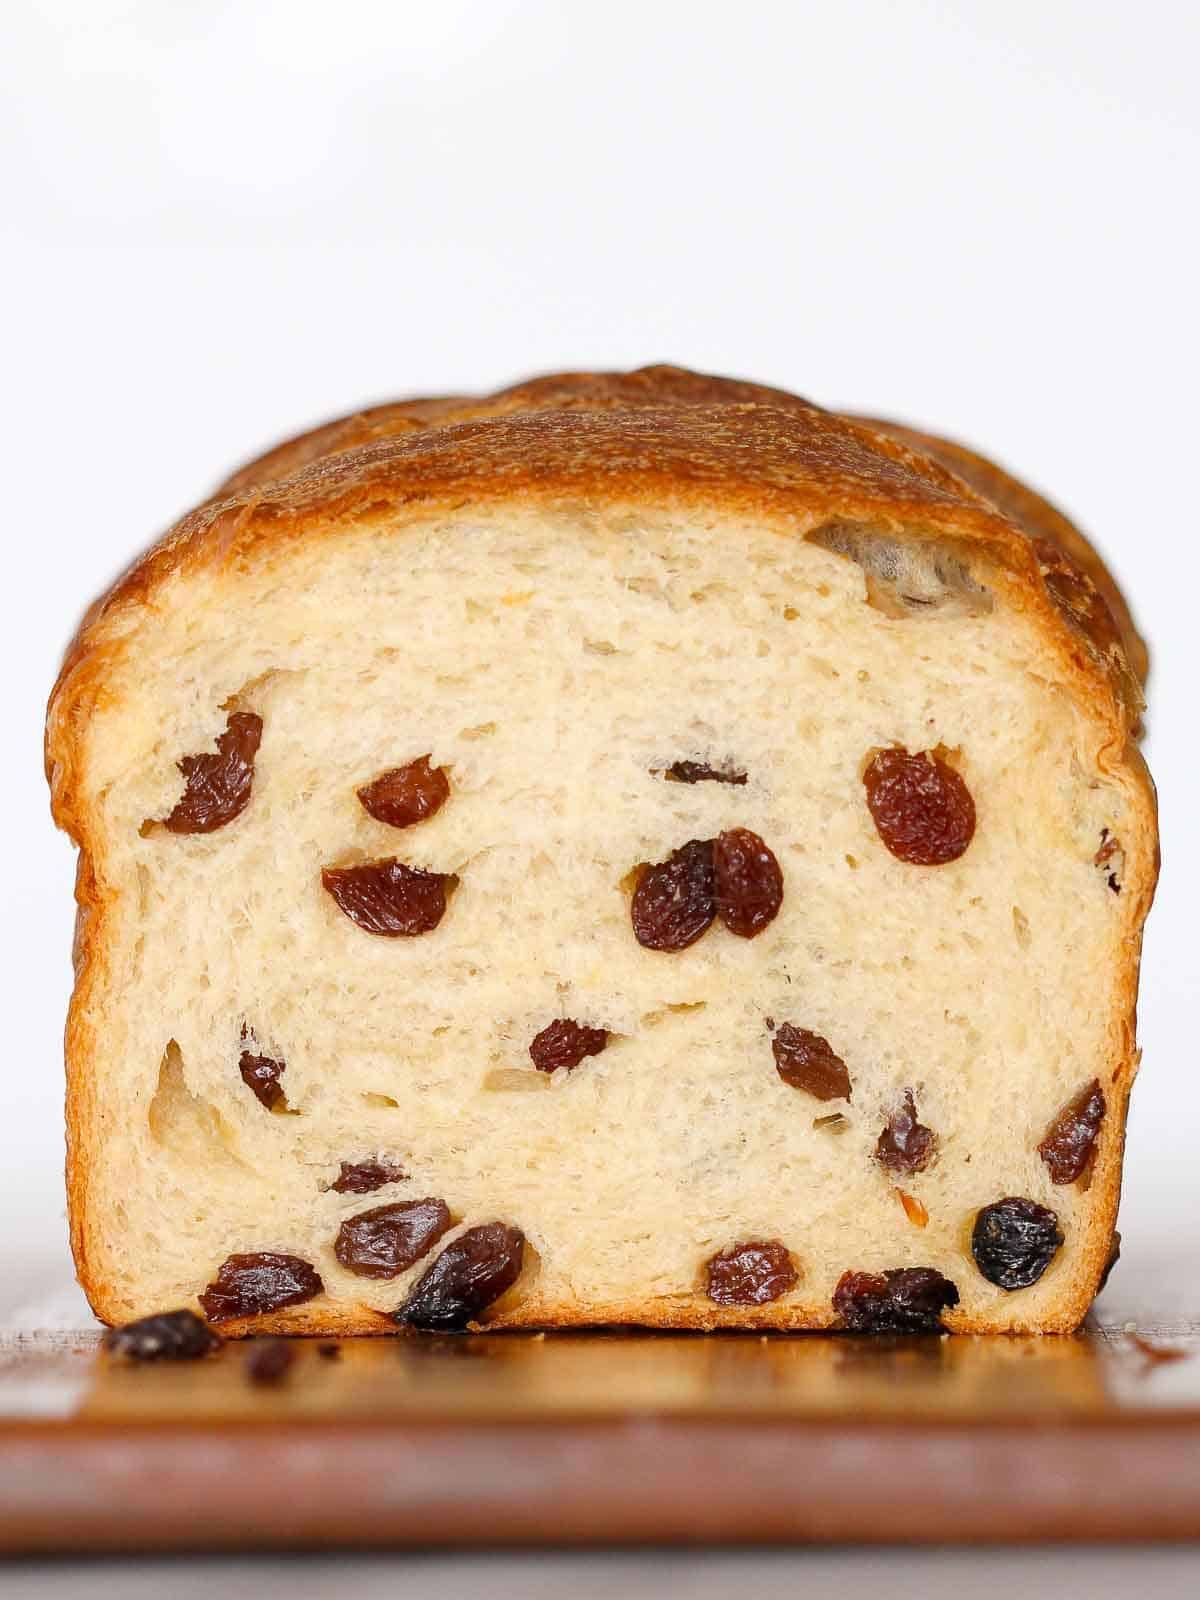
This sourdough raisin bread is soft, chewy, buttery, and packed full of raisins! It is slightly sweet from the honey, making it the perfect bread for breakfast or an afternoon snack.

A Quick Look At The Recipe
This is a brief summary of the recipe. Jump to the recipe to get the full details.
Jump to RecipePrep Time
5 hours
Cook Time
35 minutes
Total Time
5 hours 35 minutes
Servings
12 Slices
Difficulty
Moderate
Calories *
436 kcal per serving
Technique
Mix sponge, mix dough, add butter, divide, shape, proof and bake.
Flavor Profile
Soft, buttery sourdough bread packed with raisins.
* Based on nutrition panel
Exactly what I was looking for, thank you! Turned out perfect!!!! Can’t wait to try your Irish soda bread! ⭐⭐⭐⭐⭐
Sarah
Why You Will Love This Sourdough Raisin Bread
- Take all that flavor and add in some butter! Oh, yes, this excellent bread is a brioche! The butter adds a soft richness to the dough. It also makes the crust soft!
- Soft, light, and moist bread. Using a sponge helps create that light and airy texture. Along with the honey, milk powder, and butter, creating a crumb that borders on the obscene!
- Easy, same-day sourdough bread recipe! You can start this bread in the morning and have an absolutely delicious bread by the late afternoon!
Table of Contents
- Why You Will Love This Sourdough Raisin Bread
- Ingredients & Substitutions
- Variations for Sourdough Raisin Bread
- Professional Tips
- What is a pre-ferment, and what does it do?
- How to Make Sourdough Raisin Bread
- Chef Lindsey’s Recipe Tip
- Recipe FAQs
- Recommended Bread Recipes
- Sourdough Raisin Bread Recipe
- Before You Go
Bread is my weakness. Basically, it’s that one thing (besides my family 🥰) that I couldn’t live without. Every single bite of this soft, tender, buttery sourdough raisin bread is packed full of sweet plump raisins balanced perfectly with the light sourdough flavor.
Looking to expand your homemade bread repertoire? Start with this easy dinner roll recipe or sourdough rolls. They are perfect for weeknight dinners or special occasions! And for everyday bread, you can try this potato bread or this whole wheat sandwich bread recipe.
Ingredients & Substitutions
- Water
- Sourdough Starter: You will need an active sourdough starter for this recipe. If you don’t have a sourdough starter and don’t want to make one, then try my raisin bread recipe instead, or add raisins to this brioche bread recipe or brioche bun recipe for an easy roll option!
- All-Purpose Flour: You can use bread flour if that’s what you have! I would not suggest substituting whole wheat flour as it hydrated differently so you can make this whole wheat sourdough bread and add raisins!
- Honey: Honey is food for the yeast! It helps kickstart the yeast and adds a hit of sweetness to the bread.
- Active Dry Yeast: If you don’t have active dry yeast, you can substitute double the weight of fresh yeast or half the weight in instant yeast.
- Dry Milk Powder: Milk powder adds richness without needing to use milk; however, you can omit the milk powder and replace the water with milk if that is what you have on hand.
- Kosher Salt
- Unsalted Butter
- Raisins: Much like my old-fashioned oatmeal cookies, this bread is packed full of raisins. A full pound of raisins in two loaves. Because I hate when a bread promises to be a raisin bread and then half the bites don’t have raisins and the raisins fall out of the other half of the bites.
See the recipe card for full information on ingredients and quantities.
Variations for Sourdough Raisin Bread
- Add a swirl! For a delicious sourdough cinnamon raisin bread, add a cinnamon swirl! After the bench rest, roll the loaf out into an 8×12-inch rectangle and brush it with a bit of milk or water. Then sprinkle a cinnamon sugar mixture all over the dough, or make the filling from my sourdough cinnamon rolls. Leave a small section clear, then roll the dough tightly lengthwise. Pinch the seal closed and place it in the prepared loaf pan, seam-side down. Continue with the final proof. You can see the whole process in this cinnamon swirl bread recipe.
- Change the mix-in. You can make this bread with dried currants like in these sourdough hot cross buns, cherries like my cherry sourdough bread, freeze-dried strawberries, or blueberries. Try adding some toasted pecans, walnuts, or chocolate chips. Or skip the raisins and just make my easy sourdough bread recipe!
- Make them into rolls. You can make these into individual rolls like my potato rolls. You can also use that swirl from above and turn these into sourdough raisin cinnamon rolls yum!

Professional Tips
- Make sure you switch to liquid levain. If you are already maintaining a liquid levain, then you will feed it as usual with the proportions from the recipe. If you are maintaining a stiff levain (1:1 ratio of flour to water), then be sure to feed your starter for this recipe the night before. There is 25% more water in this recipe than in your starter. This recipe is made with a liquid levain. A stiff levain will have a different effect on the bread.
- Don’t skip the preshape! The preshape allows the gluten to become accustomed to its final shape and helps strengthen the strands. Think of it like easing your bread into its final home. Then, the bench rest allows the gluten to relax, so you can finally shape it without tearing or aggravating the gluten.
- Use a kitchen scale for accuracy! Volume measurements are inconsistent, and bread is a delicate balance; adding just an extra tablespoon of flour or water will change the whole recipe.
What is a pre-ferment, and what does it do?
Pre-fermentation refers to initiating the natural fermentation process of yeast in advance. I discuss this further in my panettone recipe as well! There are two different types of pre-ferments in this dough.
- Sourdough starter is one type of pre-ferment. Clearly, this is a pre-fermentation that has been ongoing for weeks, years, or even decades.
- The second type of pre-ferment in this recipe is a sponge. A sponge uses a portion of the flour from the recipe, along with all the yeast and water. This sponge also has honey and the sourdough starter! The sponge’s job is just to give the yeast a kickstart. It adds a bit of depth of flavor, but mostly just shortens the whole process. It also is a form of autolyse because the flour and water are already forming a gluten network.
How to Make Sourdough Raisin Bread
Use these instructions to make this light and buttery sourdough raisin bread! Further details and measurements can be found in the recipe card below.
Prepare your liquid levain:
Step 1: 12-14 hours before you want to mix your dough prepare the liquid levain. In a clean container, combine AP flour, water, and yesterday’s culture (starter). Cover it up. Let it sit at room temperature until it doubles in size.
TIP: This amount is slightly more than the recipe requires because starters tend to stick to containers, spatulas, and your hands, and you don’t want to be short of what is needed in the recipe. Plus, you also need 10g to feed for tomorrow! Gotta keep that starter going!
Prepare the sponge:
Step 2: In a large bowl, dissolve the yeast in water and honey. Whisk to make sure there are no lumps of yeast in the water. Stir in the sponge portion of the flour and all the starter.
TIP: Mix until there are no lumps of flour. I always find it easier to mix by hand to ensure that all the flour is mixed properly.
Step 3: Cover with plastic wrap or a towel and place in a warm, humid place until it begins to form large bubbles and doubles.
Prepare the dough:
Step 4: Scrape the contents of the sponge bowl into the bowl of a stand mixer fitted with the paddle attachment. Add the remaining flour, salt, and milk powder to the bowl and mix on low to incorporate the ingredients. When a shaggy mass forms and there are no visible dry pieces of flour, change to the hook attachment.
Step 5: Increase the speed to medium and mix until the dough is smooth and passes the window pane test, meaning you can pull a piece of dough thin enough that light passes through it.
Window Pane Test: Take a portion of the dough and grab it from either side, gently stretching a little. Turn 90 degrees and repeat. Continue working around the square until the dough is thin enough to see light pass through. If it tears before you can get a smooth “window pane”, then it’s not done and needs more time to mix. Sometimes, trying to pull a window pane from a piece of dough that is too small or pulling too aggressively will also cause it to tear. If in doubt, grab a new and larger piece and try again.
Step 6: Add the butter and mix on medium to incorporate. Then add the raisins and mix on low until they are distributed throughout and mostly inside the dough.
Proofing and Shaping:
Step 7: Turn the dough onto a lightly floured surface and knead into a ball. Place the dough in a greased bowl, cover it with plastic wrap, and let it sit in a warm place until it has doubled in size. If you have, you can use the proof setting on your oven.
Step 8: Preshape: Turn the dough out onto a lightly floured surface and divide it into 2 portions, each weighing 790g. Preshape into a boule (round). Fold each of the four sides towards the center, then flip over. Gently pull the dough towards yourself using two hands, folding the dough gently underneath itself. Turn a quarter turn and repeat until you have a round dough ball with a smooth, tight surface. Bench rest 10 minutes. (Photo 1)
Step 9: Final shape: Flip the dough over so the seam is facing up. Grab two corners, pick it up, and allow gravity to pull the dough down, stretching it into a rectangle. Place it on the counter. Fold the top third towards the center, pressing down. Rotate 180 degrees, then repeat with the other side. Using the heel of your right hand and the thumb of your left, grab the top part of the dough, starting on the right side, and fold it over your thumb. Seal it down by pressing the heel of your right hand on the seam you just created. Repeat until you have gone the full length of the loaf, and place it in a greased baking dish. (Photo 2)


Final proof and bake:
Step 10: Preheat the oven to 350 degrees F
Step 11: Final Proof: Proof in a warm, humid place until the dough has doubled in size and feels light and airy to the touch. The dough should crest over the loaf pans.
Step 12: Brush the top of the dough with melted butter for a shiny, soft crust. (this is optional)
Step 13: Bake in the preheated oven until the internal temperature reaches 186°F.
Step 14: Turn the bread out onto a wire rack. Allow the bread to cool completely before slicing.


Chef Lindsey’s Recipe Tip
When final shaping your loaves, keep in mind the length of your loaf pan. You do not want the dough to be longer or shorter than the pan. Place your pan on the bench in front of you for easy reference. Repeat the thumb folding process if the dough log is not tight or is not long enough.
Sample Baking Schedule
This sample schedule uses an active sourdough starter and active dry yeast.
9:00 PM: The night before, feed your starter, making sure you have enough to feed and also to make the sourdough raisin bread tomorrow!
9:00 AM: Mix the sponge.
9:20 AM: Mix the dough and bulk proof in an oiled bowl.
11:30 AM: Pre-shape dough.
11:45 AM: Final Shape and proof in the loaf pan.
1:15 PM: Bake your loaves!
Recipe FAQs
Store the bread well-wrapped or in an airtight container at room temperature for up to 5 days, or freeze immediately after cooling for up to 2 months. The refrigerator will dry out the bread faster. I find it easier to pre-slice before wrapping and freezing for easy defrosting!
No, the raisins do not need to be soaked before adding them to this bread. If your raisins are on the dry side, you can soak them in fruit juice, brandy, or rum, as I do with this rum raisin banana bread. However, be sure to drain and pat them dry before adding them to the dough.
Cinnamon is an antimicrobial, meaning that it can slow down the fermentation process. If you are willing to wait longer for your bread to proof properly, by all means add away and make cinnamon raisin sourdough bread! Otherwise, save it for a swirl or add it on with butter after it is baked.
To cold proof this dough overnight, I would omit the active dry yeast and bulk rise in the fridge. Then the following day,I would shape the dough and allow a second rise at room temperature until the dough reaches the rim of the pan. Then bake! You could also take the dough to the final shape and proof overnight in the loaf pans or banneton baskets dusted with rice flour and then bake from the fridge.
In case you have leftovers, it makes fabulous cinnamon raisin french toast, easy bread pudding, or you can make this cinnamon toast recipe for an afternoon snack like my Mom used to do!
Recommended Bread Recipes

Homemade Bread Recipes
Panettone
Yeasted Bread Recipes
Raisin Bread Recipe
Sourdough Bread Recipes
Cherry Sourdough Bread

Homemade Bread Recipes
Potato Bread
If you tried this recipe and loved it please leave a 🌟 star rating and let me know how it goes in the comments below. I love hearing from you; your comments make my day!
Sourdough Raisin Bread
Ingredients
Liquid Levain:
- 147 g water
- 12 g sourdough starter
- 117 g all-purpose flour
Sponge:
- 226 g all-purpose flour
- 296 g water 90°F
- 65 g honey
- 3 g dry active yeast
- 230 g sourdough starter
Dough:
- 311 g all-purpose flour
- 40 g milk powder
- 15 g kosher salt
- 130 g unsalted butter cold, cubed
- 454 g raisins
Instructions
- Prepare your liquid levain: 12-14 hours before you want to mix your dough. Prepare the liquid levain. In a clean container, mix AP flour, water, and yesterday’s culture (starter). Cover it up. Let it sit at room temperature until it doubles in size.
- Prepare the sponge: In a large mixing bowl, dissolve the yeast in water and honey. Whisk to make sure there are no lumps of yeast in the water. Stir in the sponge portion of the flour and all the starter.
- Cover with plastic wrap and place in a warm, humid place until the sponge makes large bubbles.
- Scrape the contents of the sponge bowl into the bowl of a stand mixer fitted with the paddle attachment, add the remaining flour, salt, and milk powder to the bow,l and mix on low to incorporate the ingredients. When a shaggy mass forms and there are no visible dry pieces of flour, change to the hook attachment.
- Increase the speed to medium and mix until the dough is smooth and passes the window pane test, meaning you can pull a piece of dough thin enough that light passes through it.
- Add the butter and mix on medium to incorporate. Then add the raisins and mix on low until they are distributed throughout and mostly inside the dough.
- Bulk Proof: Turn dough onto a lightly floured surface and knead into a ball. Place the dough in a greased bowl, cover it with plastic wrap, and let it sit in a warm place until it has doubled in size.
- Preshape: Turn the dough out onto a lightly floured surface and divide it into 2 portions, each weighing 790g. Preshape into a boule (round). Fold each of the four sides towards the center, then flip over. Gently pull the dough towards yourself using two hands, folding the dough gently underneath itself. Turn a quarter turn and repeat until you have a round dough ball with a smooth, tight surface. Let the dough rest for 10 minutes.
- Final Shape: Flip the dough over so the seam is facing up. Grab two corners, pick it up, and allow gravity to pull the dough down, stretching it into a rectangle. Place it on the counter. Fold the top third towards the center, pressing down. Rotate 180 degrees, then repeat with the other side. Using the heel of your right hand and the thumb on your left, grab the top part of the dough starting on the right side and fold it over your thumb. Seal it down by pressing the heel of your right hand on the seam you just created. Repeat until you have gone the full length of the loaf, and place in a greased baking dish.
- Preheat the oven to 350°F
- Final Proof: Proof in a warm, humid place until the dough has doubled in size and feels light and airy to the touch. The dough should crest over the loaf pans.
- Brush the loaves with melted butter for a shiny, soft crust. (this is optional)
- Bake in the preheated oven until a thermometer inserted into the center reads 186°F.
- Turn the bread out onto a cooling rack. Allow the bread to cool completely before slicing.
Video
Notes
Nutrition
Before You Go
I hope you enjoyed this soft brioche raisin bread recipe. Check out our other delicious, sourdough bread recipes or other yeasted bread recipes or read up on my grandma’s Jewish apple cake!


Hi, I have a question and a suggestion 🙂
Question: “until the sponge bubbles and makes large cracks in the flour.” What do you mean by cracks in the flour?
Suggestion: When you make your video it would be helpful for me to know for example how long it took to incorporate the butter into the dough.
Thank you so much for your recipes!
I hope to try many of them 🙂
Hi Andrea! When I say “until the sponge bubbles and makes large cracks in the flour,” I mean that as the sponge ferments, bubbles form underneath the surface, and those bubbles push up, causing visible cracks to appear in the layer of flour on top. This is a sign that the yeast is active and ready for the next step! It typically takes about 3-5 minutes on medium speed in a stand mixer for the butter to fully incorporate. You’ll know it’s done when the dough looks smooth and elastic. Happy baking!
I would love to make a bread like this, but without using yeast. Any ideas on how?
You could make a quick bread instead, one of my absolute favorites is the Irish Soda Bread, which also has raisins! https://cheflindseyfarr.com/irish-soda-bread/
Exactly what I was looking for, thank you! Turned out perfect!!!! Can’t wait to try your Irish soda bread!
Thank you, Sarah! I’m biased but it’s the best! Happy baking!
I love that you gave this recipe in grams! I know bread recipes are typically in weights, but it feels like America just haven’t gotten on board with that yet. I always bake in grams myself…my kitchen scale is my best friend! Also, raisin bread is a favorite. And then to put a sourdough spin on it? I’ll eat that loaf – if you don’t eat it first, that is. Also, your boyfriend is no longer shielded as you just admitted your secret to the whole world. Oops.
Fortunately he doesn’t actually read my posts…or I think he would have had something to say about that wedding dress reference in my sourdough starter post! lol If you saw all the comments about “How dare I, as a blogger whose site has American Heritage in the name, and as an American, give recipes in grams!? Merica.” Accuracy is everything. I stand firm!
‘Merica!!