This post may contain affiliate links. Please read our disclosure policy.
These soft rolled chocolate sugar cookies decorated with my easy cookie icing are easy make, richly flavored and make the perfect chocolate cookie for decorating. A deep chocolate cookie that won’t spread or puff when baked.

These chocolate sugar cookies are soft and a little chewy, bake flat, and hold their shapes! The dough also couldn’t be easier. It’s made with melted butter in one bowl by hand or using a stand mixer. They have a similar texture to my soft cut out sugar cookies but with a rich chocolate flavor like these chocolate thumbprint cookies.
I’ve decorated these heart shaped cookies with my easy cookie icing but they are also delicious with royal icing or my cream cheese frosting for cookies! Choose any cookie cutter you want and decorate for Valentine’s Day, Weddings, Mother’s Day, Christmas, Halloween or even July 4th!
Table of Contents
Why You Will Love These Chocolate Sugar Cookies
- Easy to mix and roll. Make the dough in one bowl then roll out between parchment paper for a no-fuss rolled cookie! They only require 30 minutes of chilling before cutting and baking.
- Rich chocolate flavor. Just enough unsweetened cocoa powder gives it a deep, rich chocolate flavor without a hint of bitterness. Kosher salt and vanilla enhance the chocolate flavor for the perfect bite. They almost taste like fudgy brownies or these brownie cookies.
- Endless options. This cookie holds its shape, so choose any cookie cutter that fits the theme and decorate as ornately or simply as you desire.

Professional Tips for Making Classic Chocolate Cookies
- Roll between 2 sheets of parchment paper. This eliminates the need for bench flour or cocoa powder, which will dry out your cookie dough and make it tough. It also makes the dough easy to store and cut.
- Chill the dough after rolling. Mix, roll and then chill. The dough becomes brittle and stiff when cold, which is why it makes such sharp edges, but that means that it needs to be room temperature to be workable.
- Dutch-processed cocoa powder for richness. Any cocoa powder will work in this recipe, but the deepest, richest flavor comes from Dutch processed cocoa powder.
Ingredients
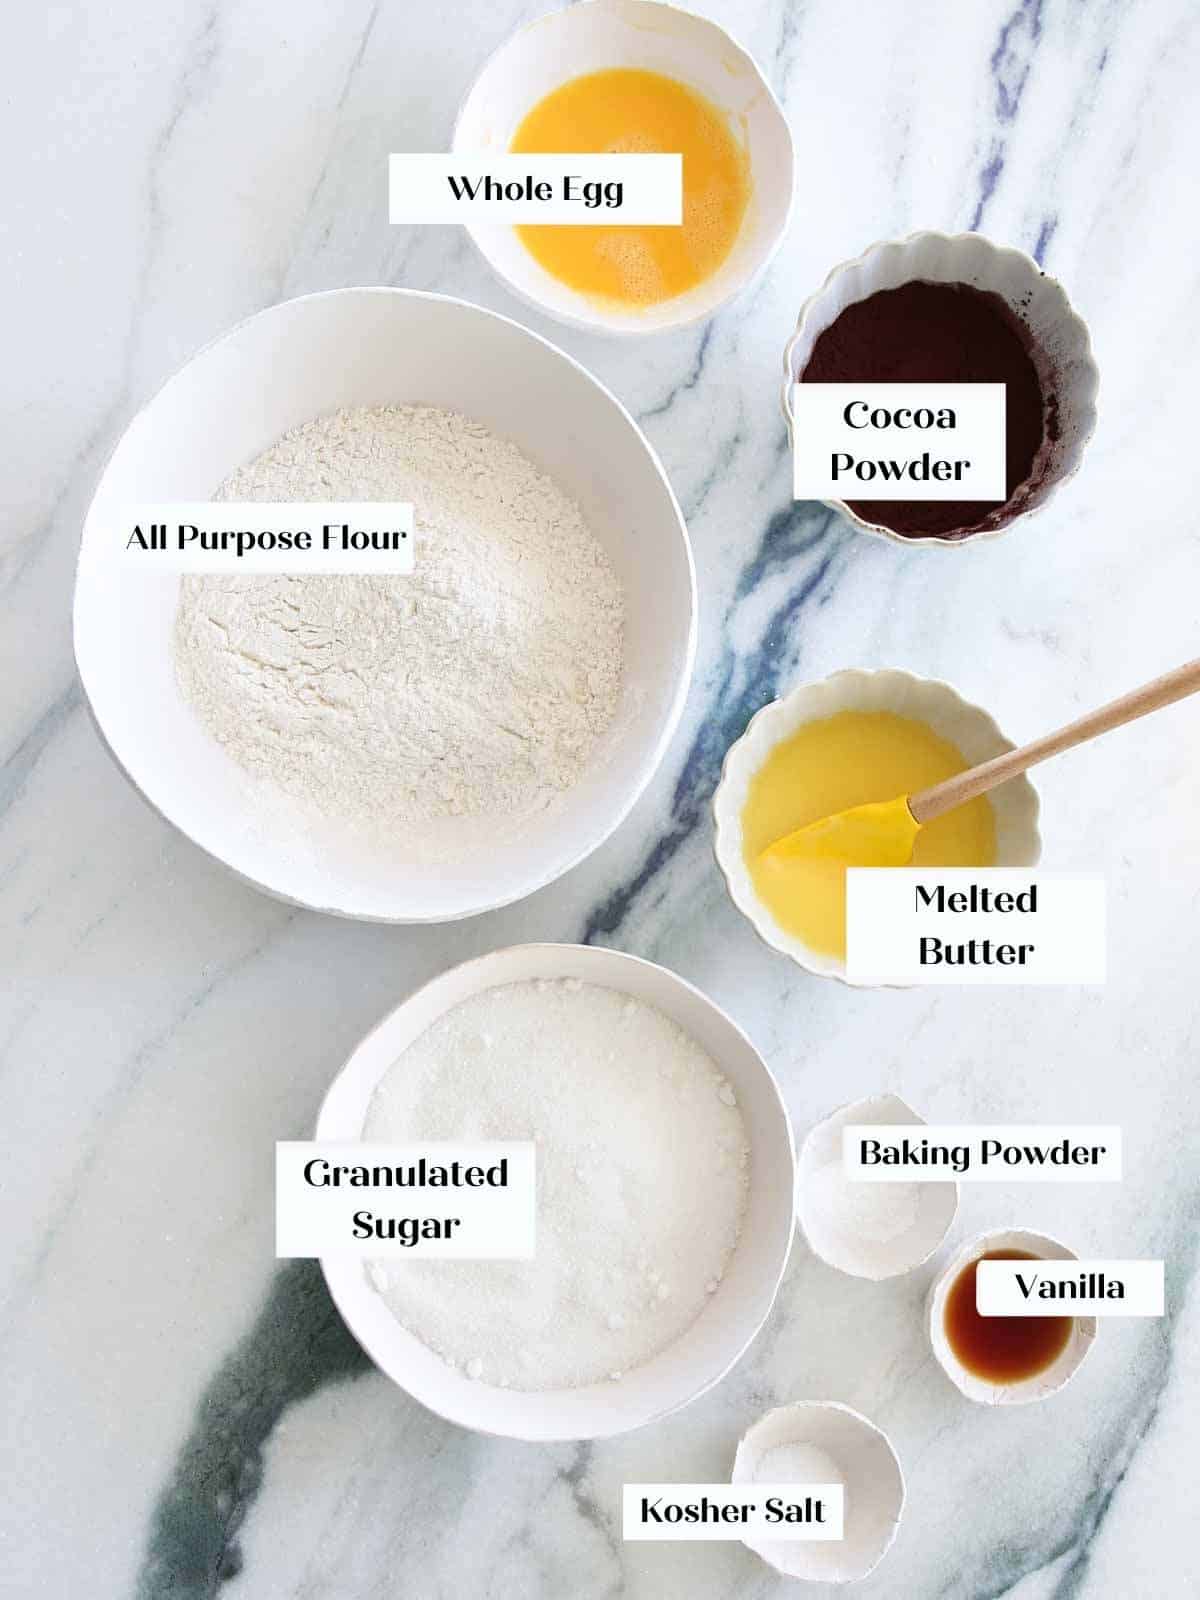
- All-Purpose Flour: Both all-purpose flour or pastry flour would work in these cookies. There is just enough gluten to create structure without making them tough.
- Dutch-Processed Cocoa Powder: This is the chocolate flavor so choose a high quality cocoa powder like Valrhona or Ghirardelli. They have a rich, robust flavor and deep color.
- Baking Powder: There is just enough baking powder to leaven these cookies without making them puffy. Too much baking powder or using baking soda will create a dome on the top of the cookies.
- Kosher Salt
- Butter: I use unsalted butter for baking, because you want to control the amount of salt you are adding. The melted butter adds fat and moisture and makes these simple cookies chewy and soft.
- Granulated Sugar: There is just enough sugar for the perfect flavor, but not so much that makes the cookies spread. Unlike chewy sugar cookies, which are intended to spread, these cookies hold their shape.
- Whole Egg: The egg is here to add fat, moisture and emulsify the dough. The fat from the yolk adds richness and helps keep the cookies chewy.
- Pure Vanilla Extract
See the recipe card for full information on ingredients and quantities.
Possible Variations
- Experiment with icing: Try with this cream cheese icing for cookies or simply brush with beaten egg white then dip in sanding sugar or sprinkles. Use the best chocolate buttercream or vanilla buttercream for a simple icing that will remain soft. Just don’t stack them! Or dip them in melted chocolate for an easy extra chocolate finish.
- Flavor the dough: Add a citrus flavor by zesting lemon or orange into the sugar before mixing. This adds a lovely flavor without adding moisture to the dough. Add a teaspoon of coffee extract in place of the vanilla.
- Add sprinkles, chocolate chips or other add-ins: That’s right, you can (and should) add some fun mix-ins to the dough. Try chopped nuts, mini chocolate chips, sprinkles or other small additions that will still allow you to roll and cut the dough.
How to Make this Chocolate Sugar Cookie Recipe
Use these instructions to make decorated chocolate sugar cookies! This tutorial will focus on the chocolate cookies, but you can find more detailed instructions for the royal icing with meringue powder and easy cookie icing in those posts.
Make & Bake the Cookies:
Step 1: In a medium bowl whisk together dry ingredients: flour, cocoa powder, baking powder, and kosher salt. Set aside. In another large bowl, melt the butter (I used the microwave) just until melted but not hot.
Step 2: Whisk the sugar into the melted butter followed by the egg and vanilla. Whisk vigorously until the mixture is emulsified. You shouldn’t see any streaks of butter or egg.
Step 3: Last, slowly stir in the flour mixture.
It does look like a dry dough, so I like to finish by hand, squeezing the dough together. This incorporates the flour faster without developing too much gluten.
Step 4: Roll your dough while it is at room temperature. Divide between two pieces of parchment. Shape into a disk and top each with another piece of parchment paper.
Step 5: Working with one piece of dough at a time, using a rolling pin, roll the dough to approximately ¼ inch. Refrigerate the dough until chilled.
This will only take 30 minutes, but I like to give it a full 2 hours or overnight to let the gluten relax.
Step 6: When you are ready to bake, preheat your oven to 325° F convection or 350° F conventional, and line baking sheets with parchment paper. Unstick the parchment from both sides of the dough, then cut shapes with a heart shaped cookie cutter (or any shape of your choosing!). Chill the cookies before baking. It will only take about 20 minutes.
You can use the second piece of parchment to line the baking sheet.
Step 7: Bake in preheated oven for 7-9 minutes or until the cookies look matte in the center and have a few small cracks. Cool completely on a rack or baking sheet before icing.
Make Easy Cookie Icing:
Step 1: In a large bowl add all the powdered sugar and corn syrup. Slowly add the milk, whisking to combine. Add milk slowly so that the icing doesn’t get too thin.
Separate the icing into different bowls and add food dye if desired. Be sure to keep an eye on the consistency and stop adding if it gets too thin. Gel food coloring is best for vibrant colors.
Step 2: When decorating with this simple powdered sugar icing, I use one consistency for outlining and flooding unlike royal icing where I have two different consistencies. The icing should flow in a thick ribbon off your whisk. It should rest for a moment on the surface of the icing in the bowl before disappearing. If it is too thin, add more powdered sugar.
Icing that is too thin will not be opaque and the chocolate cookie will show through. Add the milk slowly to prevent this from happening.
Step 3: Transfer to piping bags or clean squeeze bottles.
How to decorate cookies:
Step 1: Starting smaller than you think, cut the tip off the piping bag. Test a line. If it squiggles when you squeeze it, cut it just a little bigger. Test and repeat until you get a medium straight line.
Step 2: Working with 1-3 cookies at a time, use the outline bag to trace the outline of the cookie. Leave a 1/16th in border around the edges so it doesn’t run off the cookie!
Step 3: Switch to the flooding bag and squeeze a squiggle of icing inside the outline across the cookie you are icing. Use a cake tester, wooden skewer, or be lazy like me and use the tip of the flooding piping bag, to spread the icing around into one even layer.


You should not be able to see the cookie through the icing, but it should not be so thick that it flows over the outline. The outline should blend perfectly with the filling. If it doesn’t and you have a visible line, you can try to blend them or you can just outline fewer cookies before flooding next time.
Step 4: To make the little hearts like in these Valentine’s Day Cookies, you will need to work quickly. I typically only decorate 1 cookie at a time when doing this technique. Make dots of the second color along the edges or wherever you want the hearts. Take a cake tester or toothpick and drag the tip through the center of each dot. This will make little hearts!


Step 5: For the other style of heart cookies, decorate up to 3 cookies with the icing then sprinkle on your décor. Try crushed dehydrated strawberries or blueberries, sprinkles, mini hearts, or gold jimmies. The options are limitless.


Chef Lindsey’s Recipe Tip
I added vanilla extract to my icing for flavor and then I added just touch of white gel food coloring. This is the only way to make a pure white frosting.

Frequently Asked Questions
Store un-decorated cookies at room temperature in an airtight container for up to 3 days before decorating, but I prefer to store them frozen for up to 3 months. Store iced cookies at room temperature for up to 10 days. The icing will keep the cookies soft! After drying overnight, wrap the cookies well for best freshness.
I would not advise freezing iced cookies. They will absorb moisture and the icing will bleed.
These are excellent shipping cookies! The icing keeps them fresh for longer and more durable. Package in a closed container with ample padding. I like to put bakery paper as a cushion in the tin or box.
This chocolate cookie dough can be crumbly from improperly measuring the flour and/or cocoa powder. This is why I prefer the use a kitchen scale for measuring in grams. The dough can also be dry from subtle variations in the brand of cocoa powder used. If that is the case, add a touch extra melted butter to get the dough to come together.
Keep these and other sugar cookies soft by baking the same day you will decorate. The royal icing or cookie icing will keep them soft for up to 10 days when stored in an airtight container. It is also important to not use additional bench flour when rolling as that will dry out the dough and make the cookies drier and tough, and be sure to bake them just until the centers puff and have small cracks. Over baked cookies will be dry.
If you tried this recipe and loved it please leave a 🌟 star rating and let me know how it goes in the comments below. I love hearing from you; your comments make my day!


Chocolate Sugar Cookies
Ingredients
For the Cookies:
- 2 cups all-purpose flour
- ½ cup Dutch-processed cocoa powder
- ½ teaspoon baking powder
- ¾ teaspoon kosher salt
- ½ cup unsalted butter melted but not hot
- 1 ¼ cup granulated sugar
- 1 whole egg
- 2 teaspoons vanilla
For cookie icing:
- 2 cups powdered sugar
- 1 tablespoon light corn syrup
- ½ teaspoon vanilla optional
- Pinch kosher salt
- 2-3 tablespoons whole milk more as needed
Instructions
Make the cookie dough:
- In a large bowl whisk together flour, cocoa powder, baking powder, and kosher salt. Set aside.
- In another large bowl, melt the butter (I used the microwave) just until melted but not hot. Whisk in the sugar followed by the egg and vanilla. Whisk vigorously until the mixture is emulsified. You shouldn’t see any streaks of butter or egg.
- Slowly stir in the flour mixture.
- It does look like a dry dough, so I like to finish by hand, squeezing the dough together. This incorporates the flour faster without developing too much gluten.
- Roll your dough while it is at room temperature. Divide the dough between two pieces of parchment, shape into a disl, and place another piece of parchment on top of each.
- Roll the dough to approximately ¼ inch. You will have the best results if rolled between two pieces of parchment, but you can also roll out on a lightly floured surface.
- Refrigerate the dough until chilled. This will only take 30 minutes, but I like to give it a full 2 hours or overnight to let the gluten relax.
Cut & bake cookies:
- When you are ready to bake, preheat your oven to 325° F convection or 350° F conventional, and line two baking sheets with parchment paper.
- Unstick the parchment from both sides of the dough, then cut shapes with a lightly floured cookie cutter. Chill the cookies before baking. It will only take about 20 minutes.
- Bake in preheated oven for 7-9 minutes or until the cookies look matte in the center and have a few small cracks. I bake all the same shapes on one sheet to ensure even baking.
- Cool completely before icing.
Make Cookie Icing:
- In a large bowl add all the powdered sugar and corn syrup. Slowly add the milk, whisking to combine. Add milk slowly so that the icing doesn’t get too thin.
- Separate the icing into different bowls and add food dye if desired. Be sure to keep an eye on the consistency and stop adding if it gets too thin. Gel food coloring is best for vibrant colors.
- When decorating with this simple powdered sugar icing, I use one consistency for outlining and flooding unlike royal icing where I have two different consistencies. The icing should flow in a thick ribbon off your whisk. It should rest for a moment on the surface of the icing in the bowl before disappearing. If it is too thin, add more powdered sugar.
- Transfer to piping bags or clean squeeze bottles.
Video
Notes
Variations – Try using lemon or orange zest in the sugar, different extracts or small mix-ins like mini chocolate chips or sprinkles.
Storage – Store cookies with icing at room temperature for up to 10 days. Allow the icing to set 24 hours before stacking, and allow it to set 3 hours before wrapping with plastic wrap (not touching the surface).
Nutrition
Before You Go
I hope you enjoyed this professional chef tested recipe. Check out our other delicious, chef-developed chocolate recipes like this rich, moist chocolate bundt cake, or these easy chocolate dessert recipes!


tbh I’ve messed this up before and wanted to finally understand what I was doing instead of guessing. Cutting shapes was smooth and they held every detail. They held up beautifully for gifting! Total confidence boost.