This post may contain affiliate links. Please read our disclosure policy.
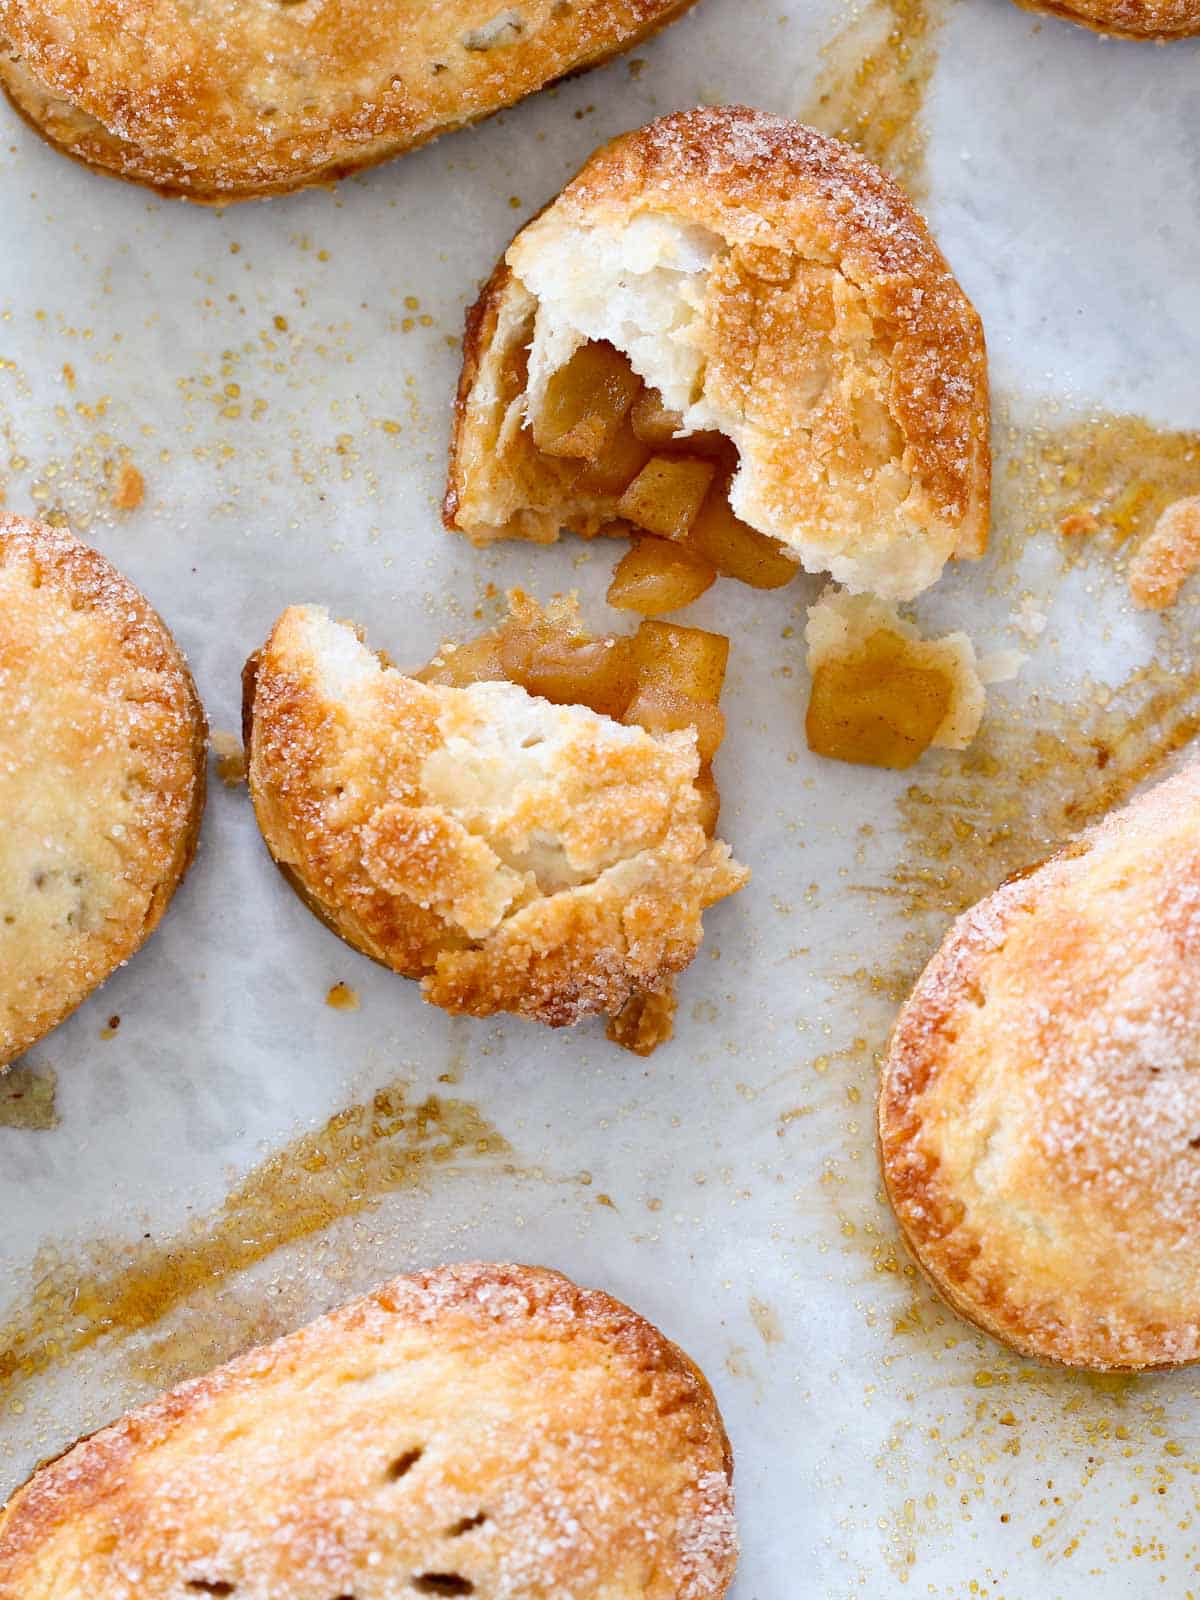
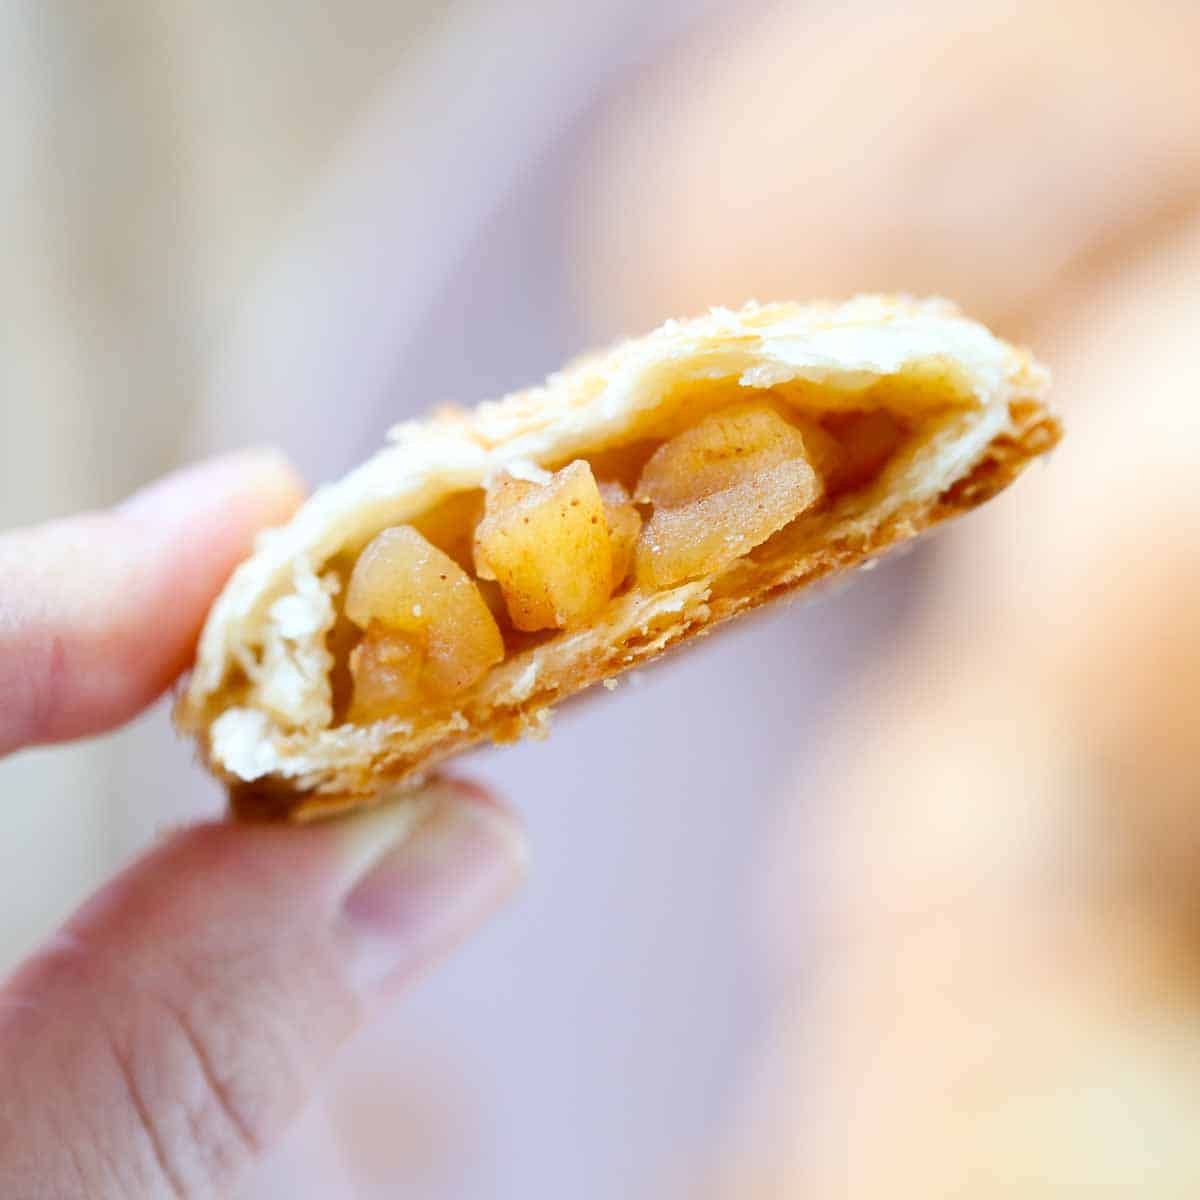
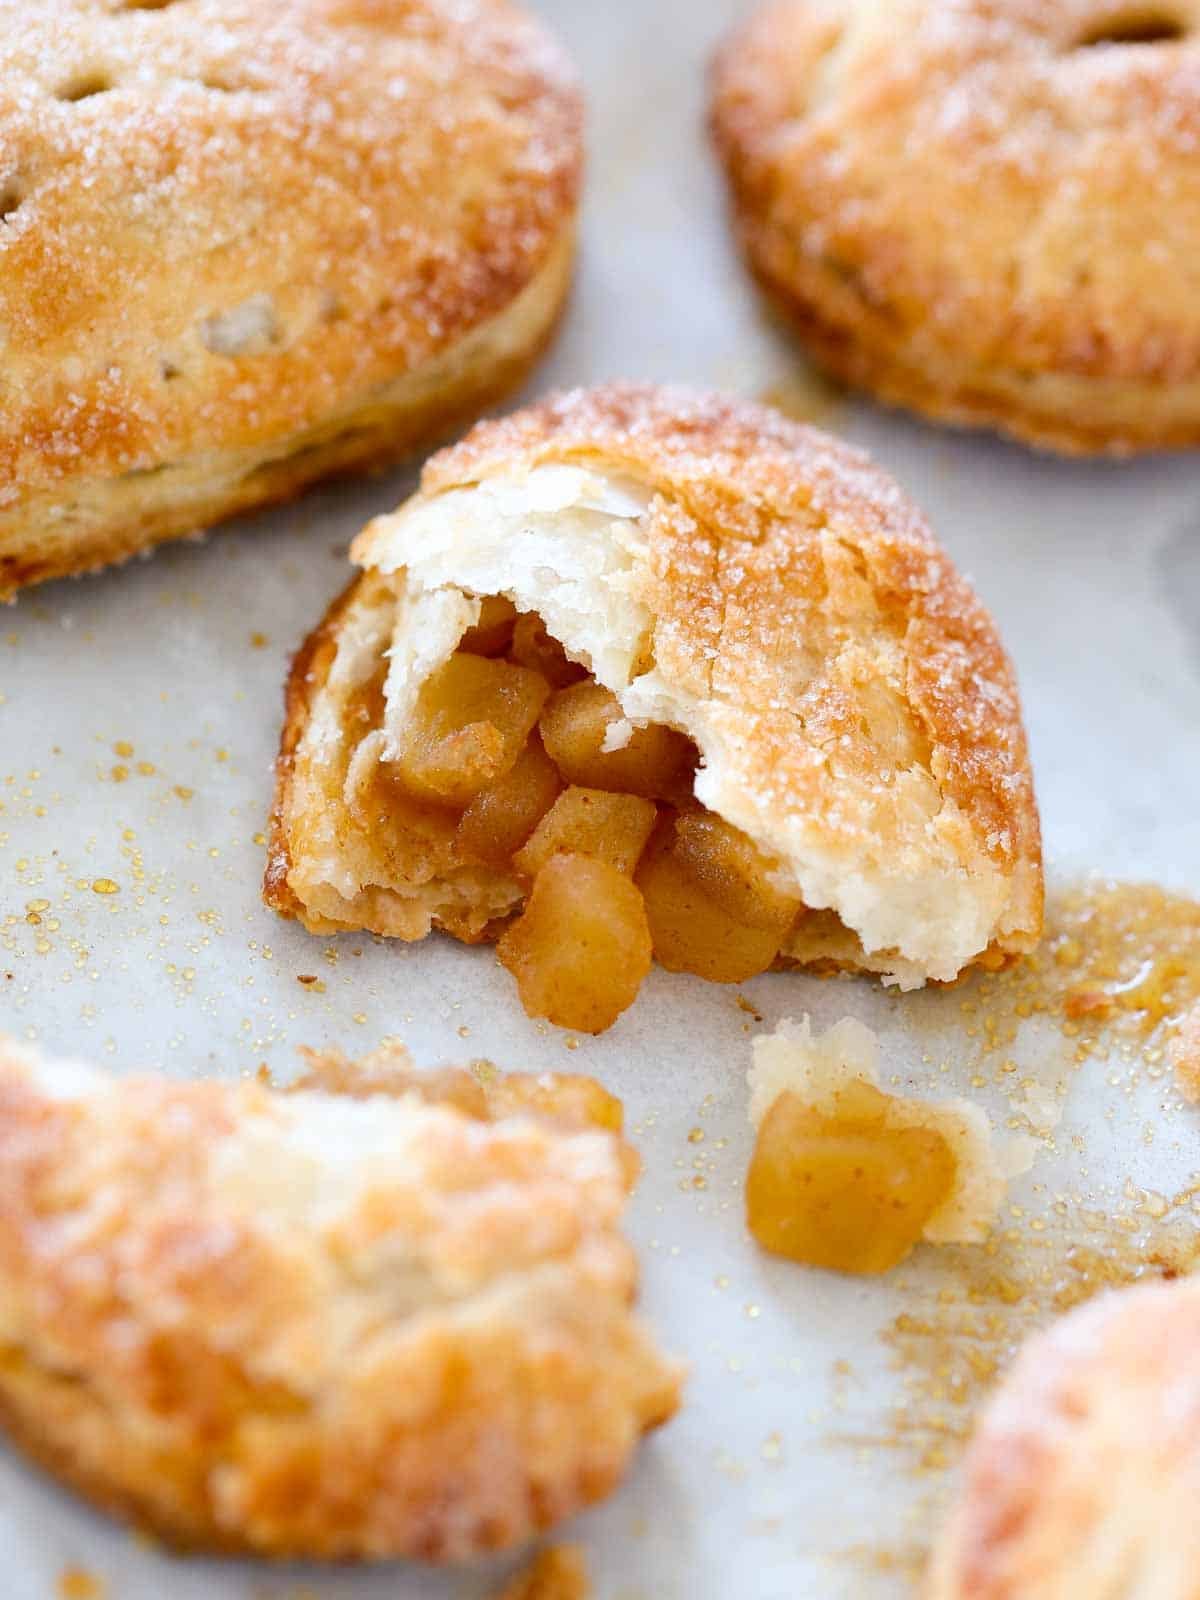
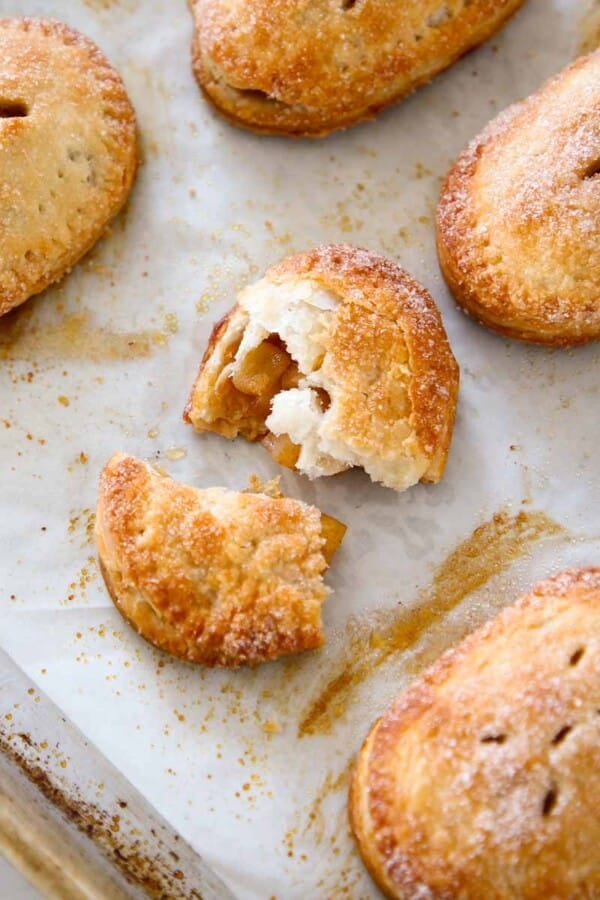
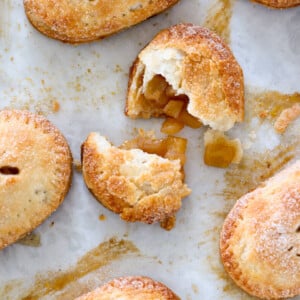
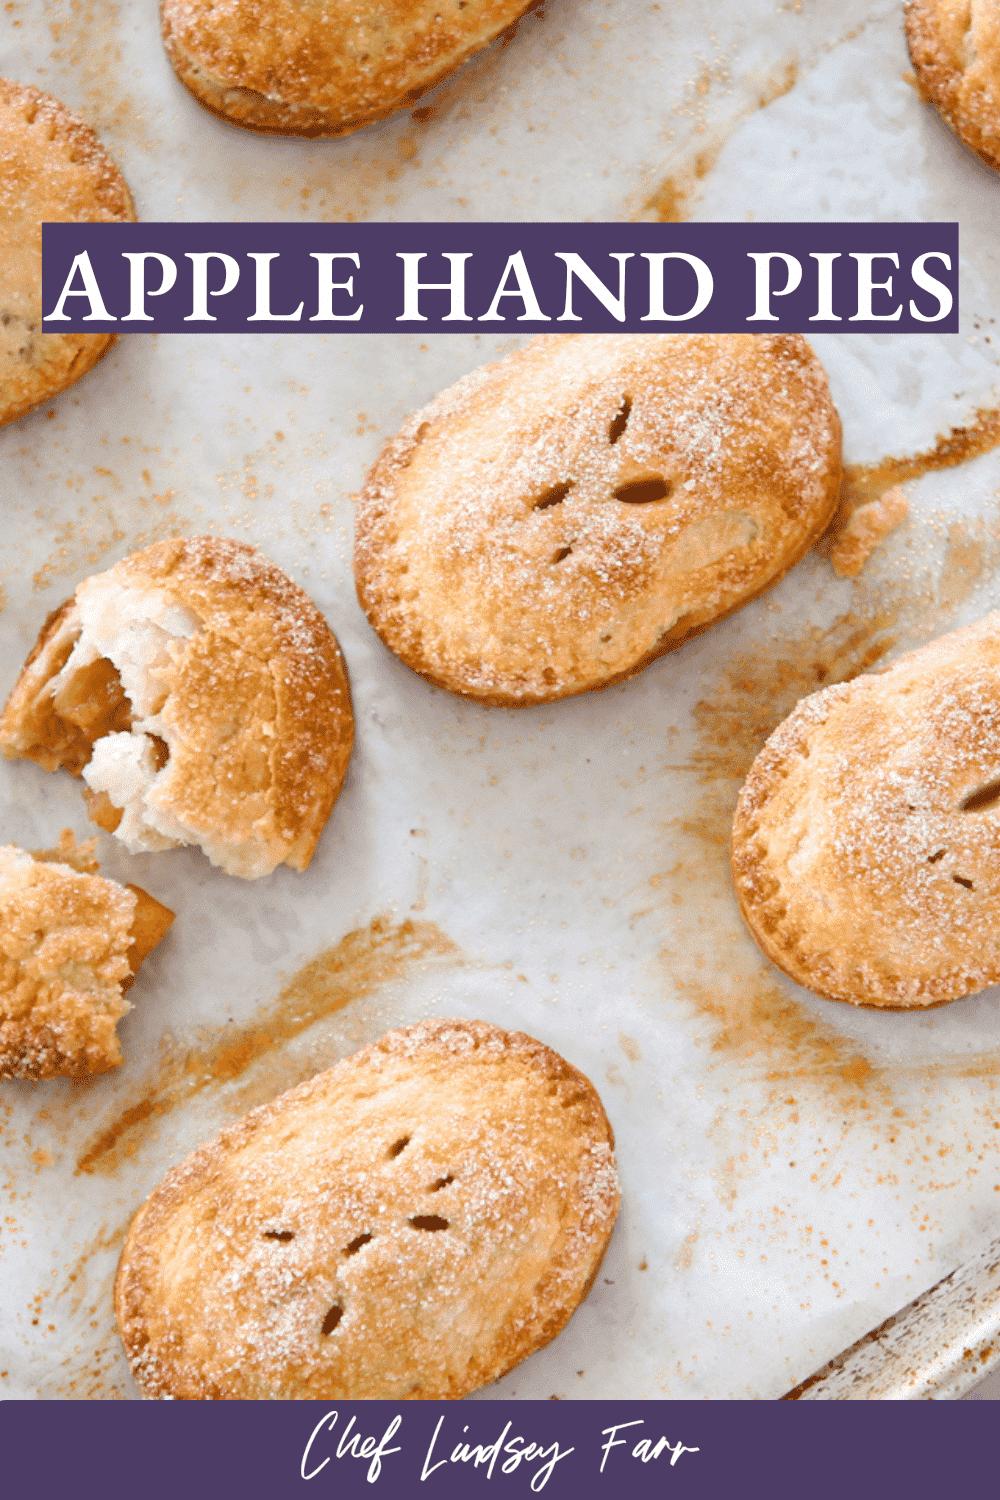
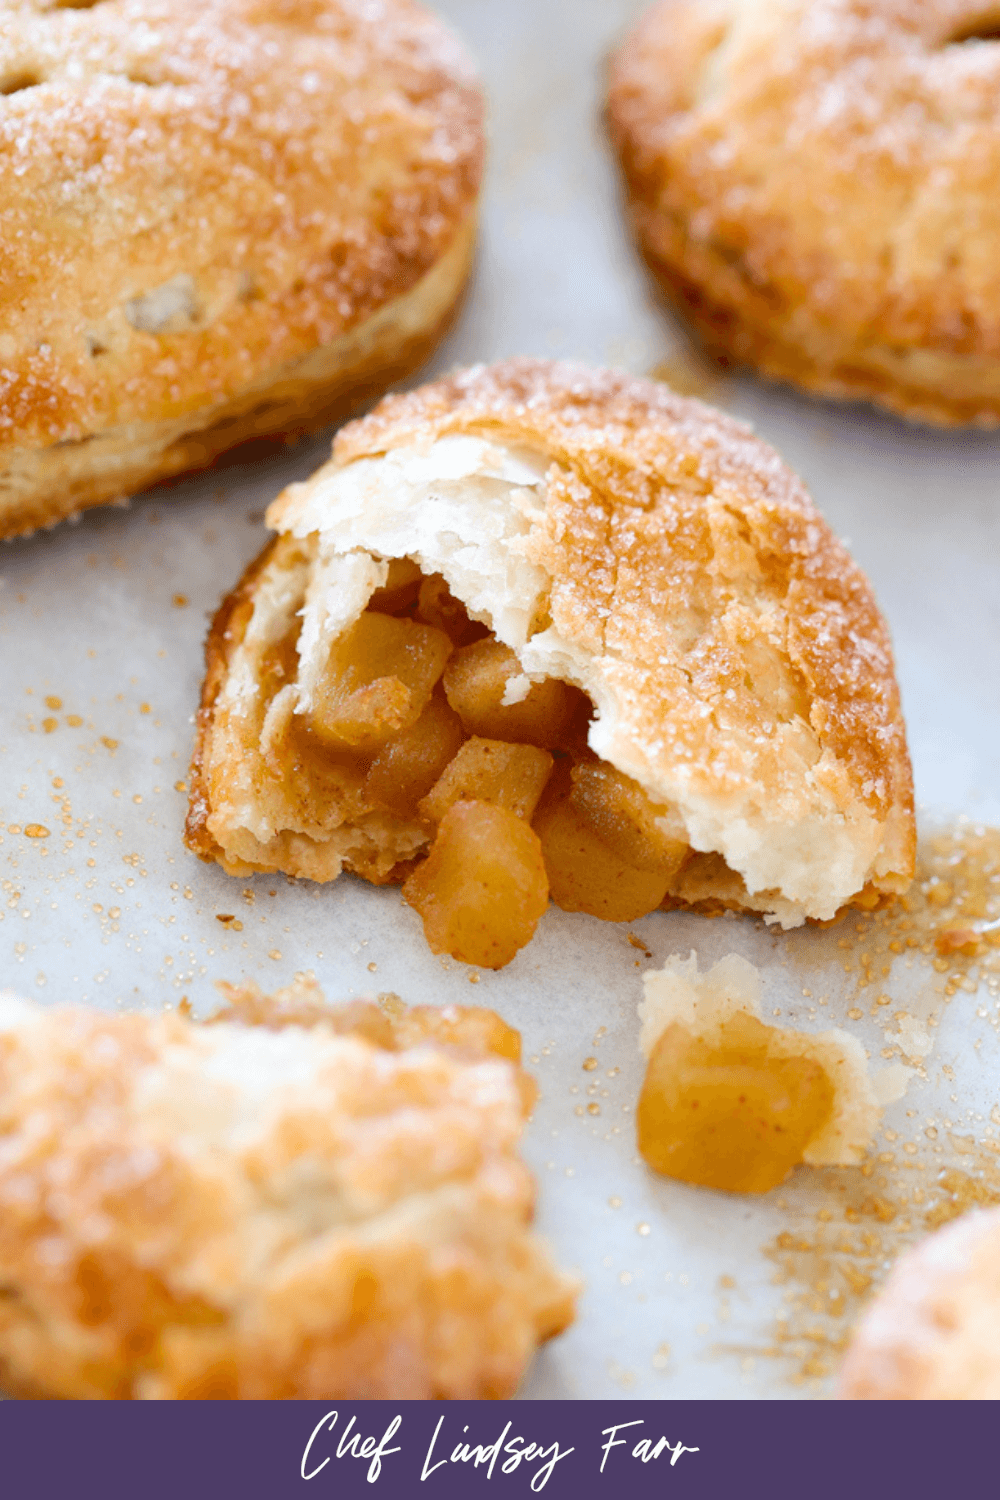
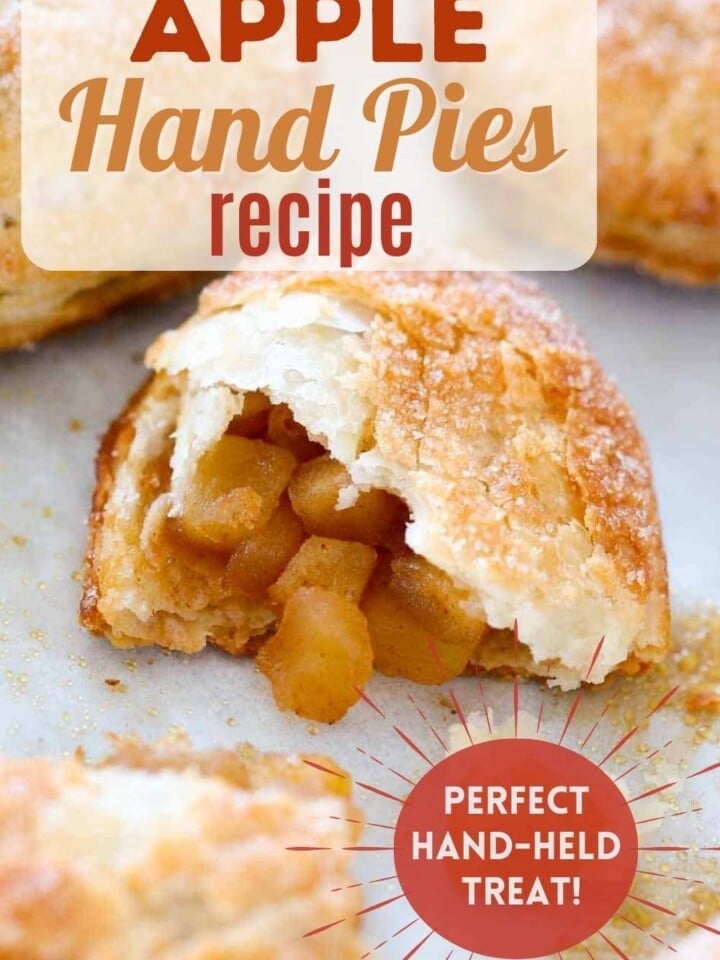
These easy Apple Hand Pies have a flakey all-butter pie crust filled with a homemade cinnamon apple filling and a cinnamon sugar topping! They are easy to make and they bake in under 20 minutes. The perfect hand-held treat!
A Quick Look at the Recipe
- Prep Time: 30 minutes
- Cook Time: 20 minutes
- Chill Time: 30 minutes
- Total Time: 1 hour 20 minutes
- Servings: 9 hand pies
- Calories: ~268 kcal per pie (based on nutrition panel)
- Technique: Make an all-butter vodka pie crust, fill with spiced apple compote, seal, chill, and bake until golden.
- Flavor Profile: Flaky, buttery pastry with a warm cinnamon apple filling and crisp sugared crust.
- Difficulty: Intermediate. Keeping the dough cold and sealed properly takes a bit of care, but the steps are simple!
Featured Comment
⭐⭐⭐⭐⭐The pie dough really makes these hand pies stand out! It is crispy, flaky, and tastes amazing! I made the pie dough one day, then the filling the next, and assembled it on the third day. It really made the whole process seem really easy. – Mara
Why You Will Love This Recipe
- Easy & portable. Nothing beats a grab and go dessert! No utensils required. Just as easy to prepare as it is to eat.
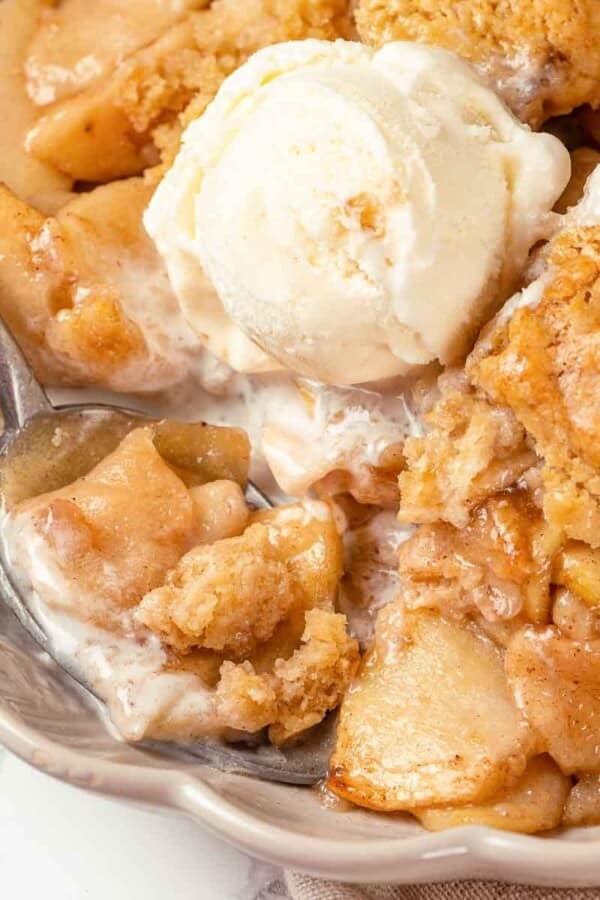
- A surprisingly versatile dessert. Hand pies can be eaten cold, room temperature or warm. Serve alone or with a dipping sauce like salted caramel sauce, or make it into a fun plated dessert experience with vanilla bean ice cream or crème anglaise!
- An easy way to feed a crowd. Hand pies are a great way to serve apple pie up to a crowd! You can even assemble them ahead, freeze, and bake straight from frozen!
Table of Contents
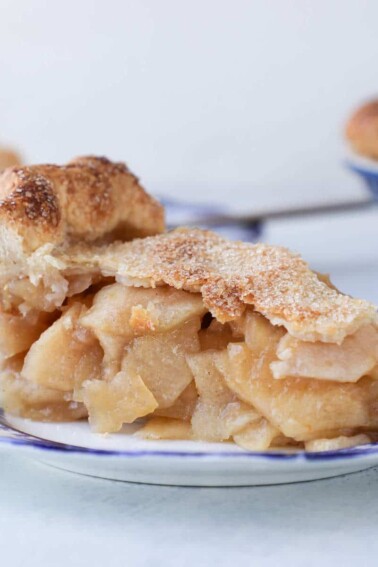
These apple hand pies have an easy cinnamon apple filling made with only 6 ingredients in under 30 minutes! They have all the flavor of my easy apple pie or mile high apple pie with a fraction of the effort. You can use store-bought pie dough for an even easier dessert.
While you could eat it warmed up on-the-go, I prefer mine with a scoop of vanilla bean ice cream, a drizzle of salted caramel sauce, or a generous pour of vanilla crème anglaise.
Ingredients
- Pie Crust: I used my easy vodka pie crust, but you could use this all-butter pie crust or make it vegan with a crisco pie crust!
- Egg: This is just one beaten egg that is used for the egg wash. Its sole purpose is sealing together the top and the bottom crusts. You could use water instead.
- Heavy Cream: Brushing a little heavy cream on the pie crust prior to baking will aid in browning but also hold whatever sugar mixture you are sprinkling on top. Without a little heavy cream, the sugar won’t adhere and you won’t get that caramelized, sugary crust.
- Cinnamon Sugar: I sprinkled cinnamon sugar on top of these apple hand pies. You could buy this pre-made or use the recipe from my snickerdoodles.
- Apples: I use a mix of different varieties in these mini apple pies for texture and flavor. In this recipe I used honeycrisp, granny smith and cripps pink! Just make sure it can stand up to being cooked twice. Macintosh are not a great choice here.
- Sugar: I use a mix of granulated sugar and brown sugar for added sweetness. There are also some molasses notes from the brown sugar.
- Ground Spices: I love the mix of ground ginger and cinnamon here. They add a bit of warmth and depth to the filling. You could also use apple pie spice or make this apple compote recipe instead! Better yet, double it and then make apple cinnamon rolls too!
- Lemon: Lemon juice tempers the sweetness from the sugar and also draws out the apple flavor while complementing it.
Why did my apple hand pies leak?
These are the top 6 reasons that hand pies leak:
- The dough shrunk and couldn’t contain the filling anymore. This happens when the dough was rushed and wasn’t given time to chill between each step.
- They were over filled. Double stuffed Oreos are magical, but I cannot say the same for apple hand pies. Try to find the balance between too little and too much.
- The dough wasn’t sealed. I always seal the edges of the dough with a bit of egg wash, aka beaten egg. Water can work in a pinch as well. Then I guild the lily and press them together with the tines of a fork.
- Too much egg wash was used. The opposite side of that coin is that if you put too much egg wash or water, the two sides won’t stick together at all and will pop open. It should be just enough to moisten the dough. Only put it on either the top or the bottom, not both.
- You forgot to vent them! If you don’t allow for a place for the steam to escape, it will push its way out the weakest seam. That would be the one you created between the top and bottom crusts. Sad but easy to avoid.
- The least common reason is that the dough was handled too perfectly. You will know this is the case if the edges look like puff pastry rather than pie dough. Pat yourself on the back because you rock! They are going to taste amazing.
To avoid all that stress, you could always use a shortening pie crust instead. The texture will be more crumbly rather than flakey.
Variations
- Change the flavor of the filling: Use store-bought pie filling, or use the filling recipes from this cherry pie, blueberry pie, peach pie or mixed berry pie. You could also use the same recipe but substitute pears.
- Make it a caramel apple hand pie: Caramel and apples go together like peanut butter and chocolate. Simply stir some salted caramel sauce or even a maple caramel sauce into the filling before assembling.
- Make any shape you’d like: I used oval cookie cutters just because I could! You can use any cookie cutter that will bring a smile to your face. Do choose one that has enough space for filling and to crimp the edges a bit, so now is not the time for that cute snowflake cutter. I suggest stars, apples, fluted circles, or even diamonds! If you want to change the format completely, make these apple pie cookies next!
Professional Tips
- Keep your pie dough cold. For a flakey, crispy exterior, keep the pie dough chilled throughout the assembling process. This will also allow you to roll the dough thinner and restrict gluten development, which makes pie dough shrink and tough.
- Use just the right amount of filling. Underfilling hand pies is just sad, but overfilling will make them difficult to seal and all the filling will leak out regardless. Also sad.
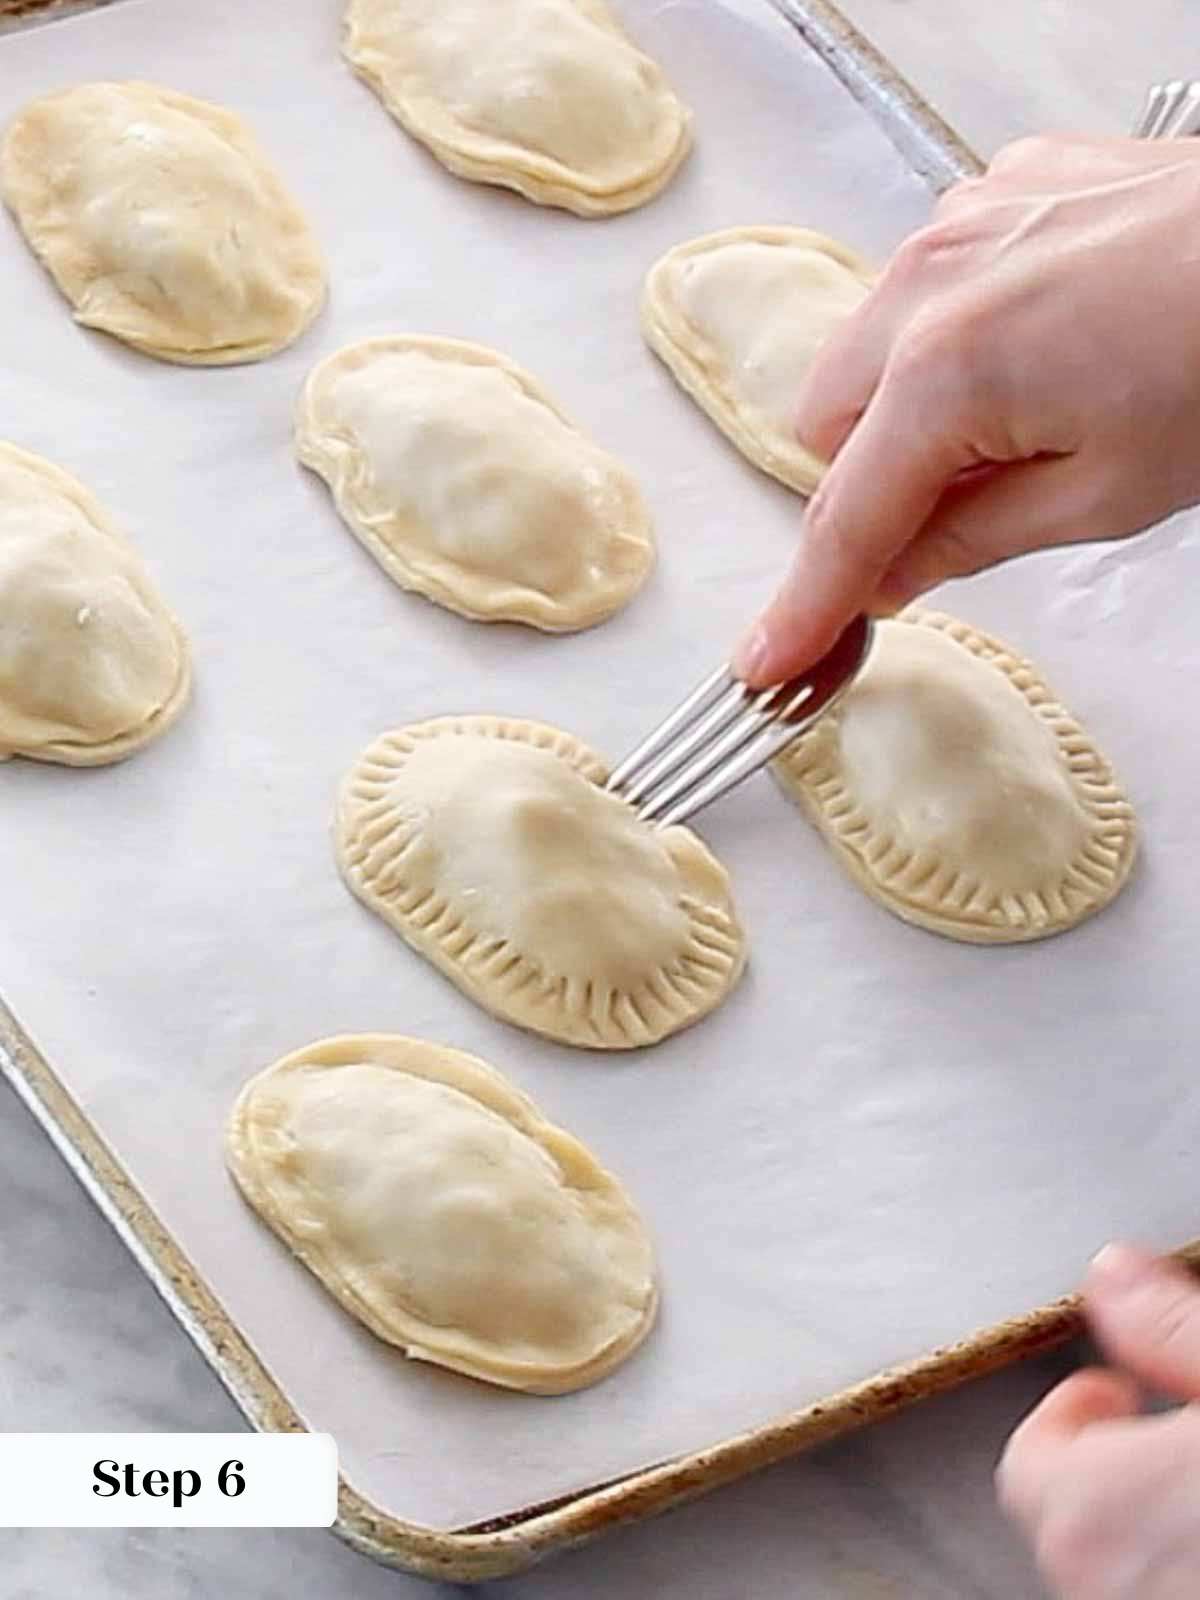
- Seal the edges properly. I use just a little brush of beaten egg (egg wash) between the top and bottom crusts, then I firmly press the tines of a fork around the edges to seal the layers together.
How to Make Apple Hand Pies
Use these instructions to make the perfect hand pies every time! Further details and measurements can be found in the recipe card below.
Prepare the apple filling:
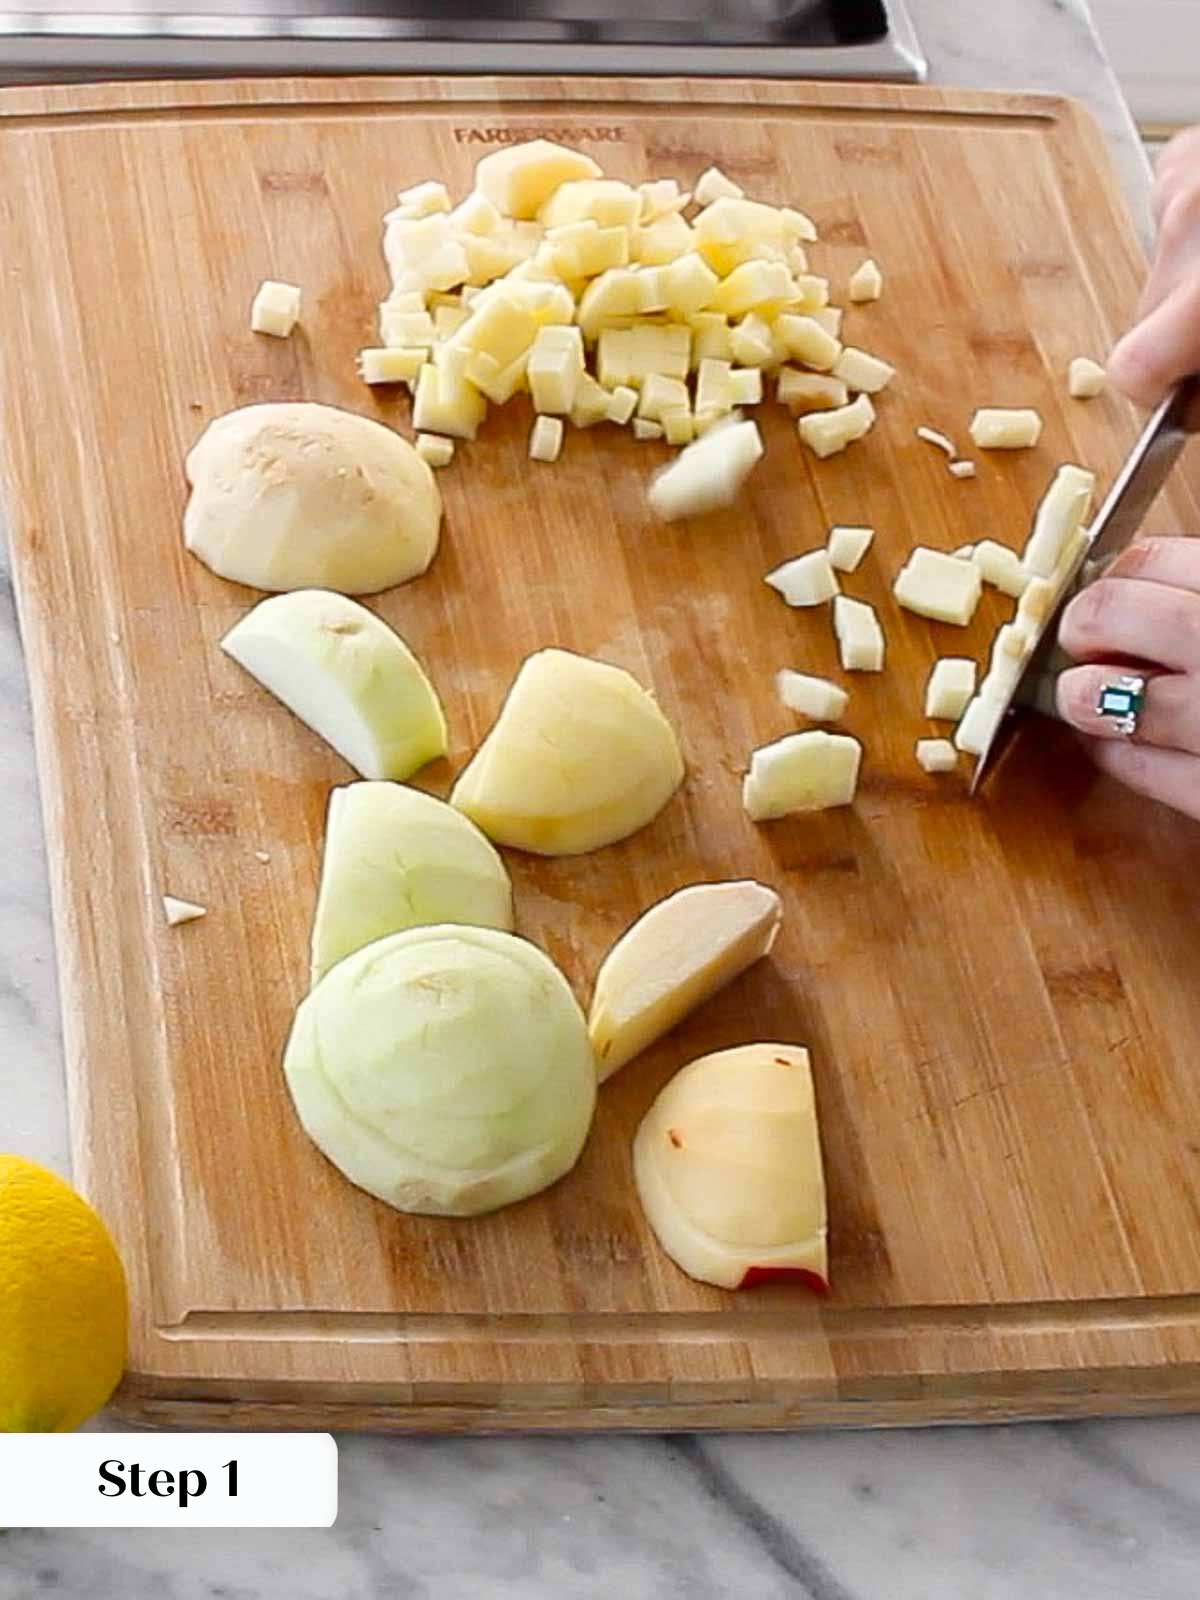
Step 1: Peel and dice the apples so they are about ½ -1 centimeters in diameter.
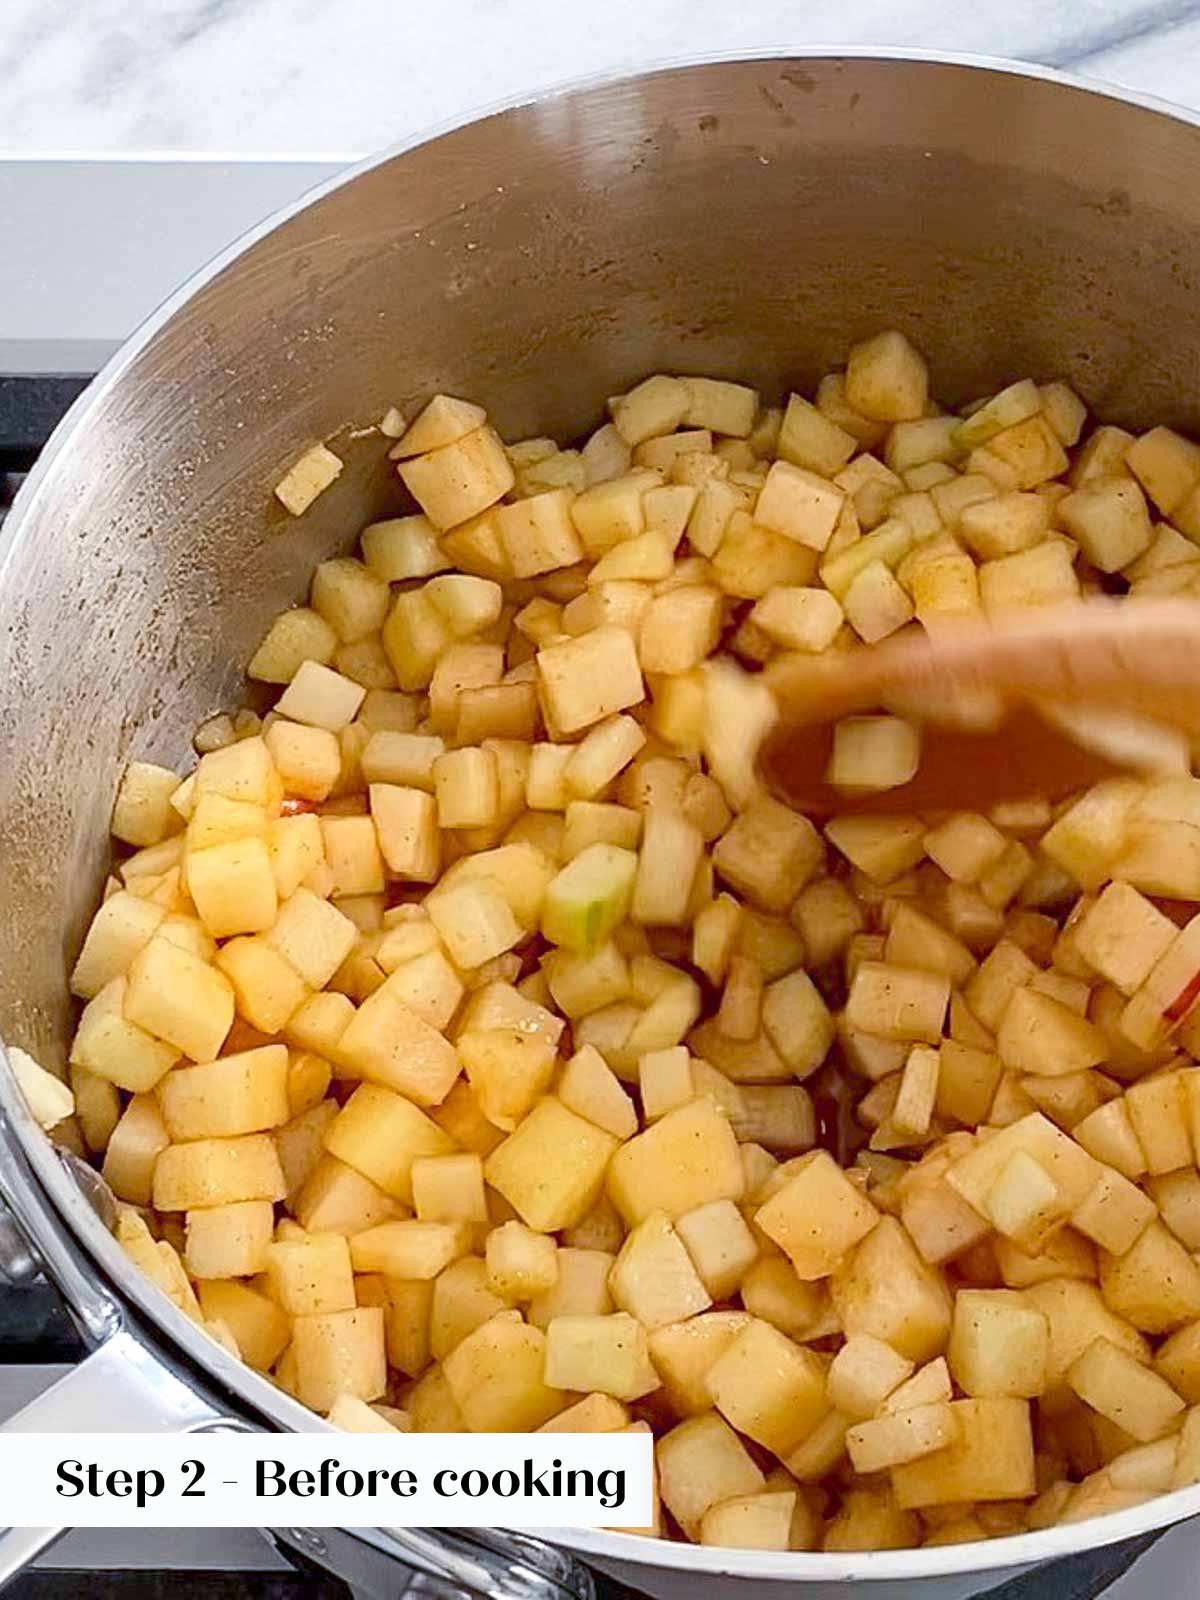
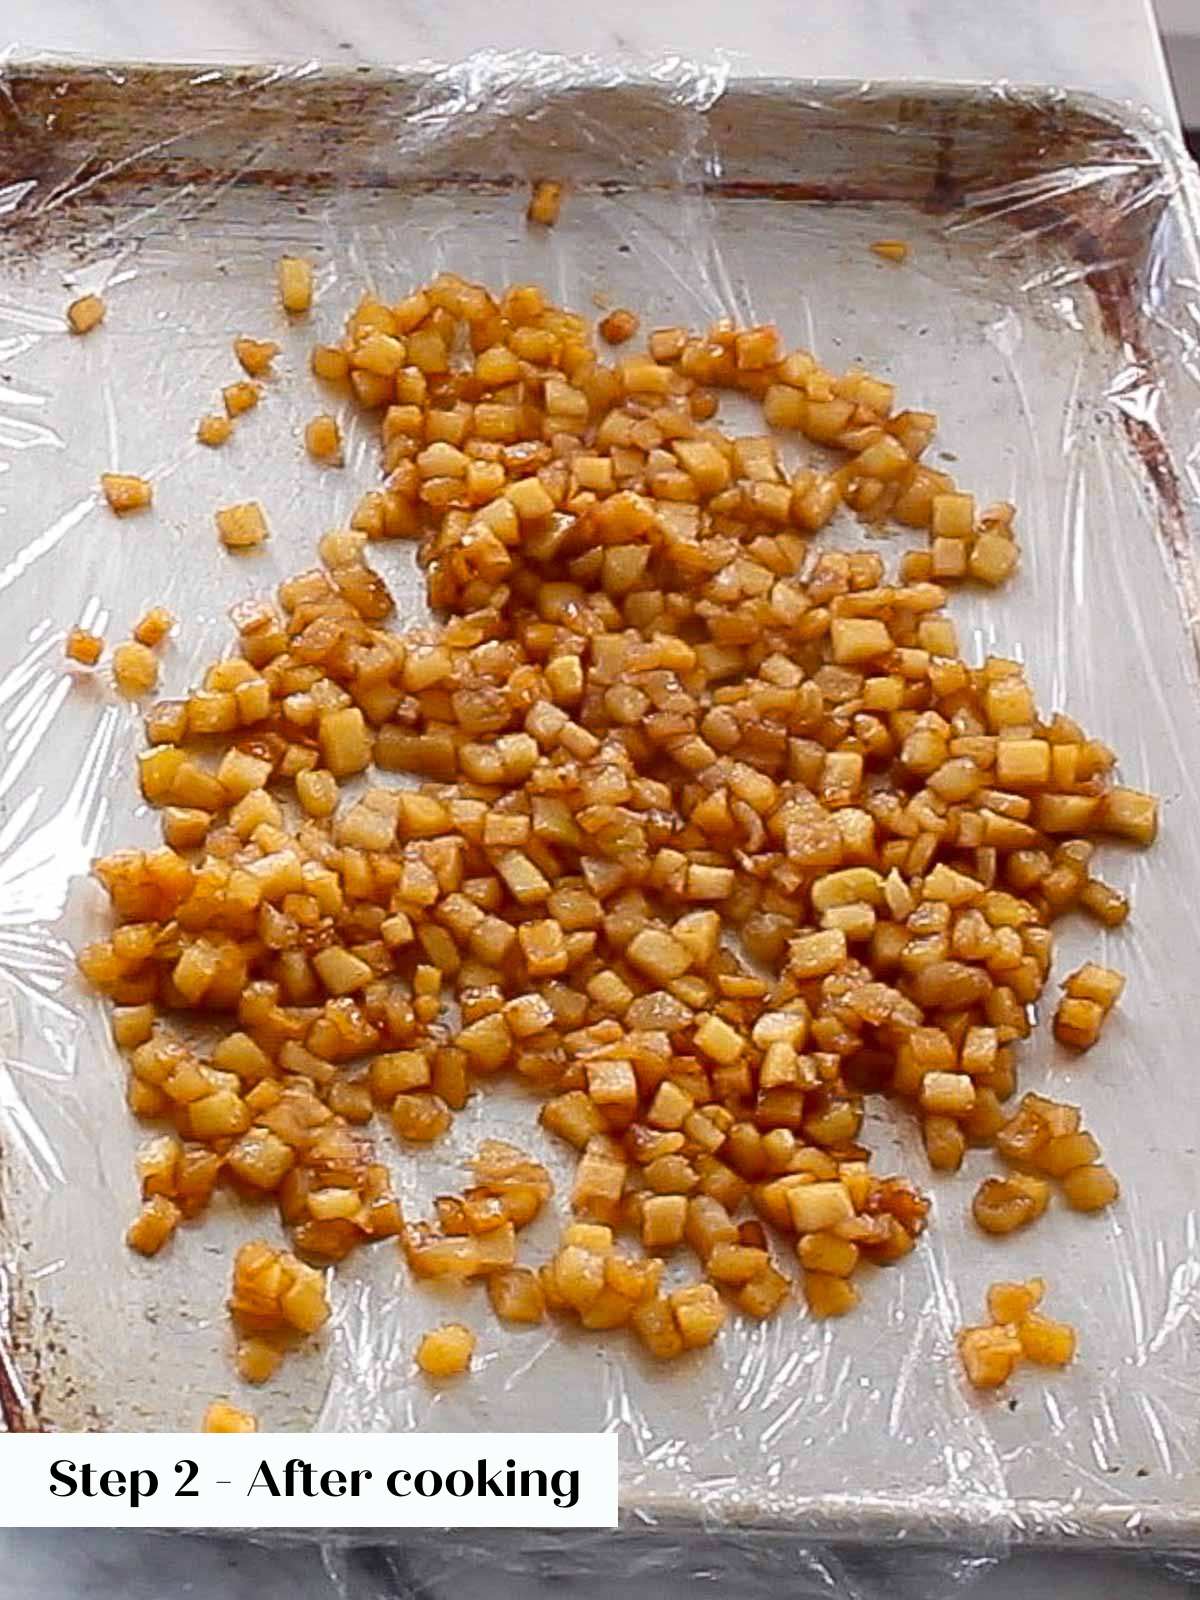
Step 2: In a small pot combine apples, white sugar, light brown sugar, ground ginger, cinnamon and lemon juice and mix to coat the apples. Heat on medium low until the apples begin releasing their juices. Increase heat to medium high until the juices are thickened and the apples are tender. Cool completely.
To cool apple pie filling rapidly, pour out in a single layer on a parchment paper lined rimmed baking dish. Refrigerate or freeze until cool. This will only take 10 minutes or so.
Assemble & bake:
Step 3: Preheat oven to 375°F.
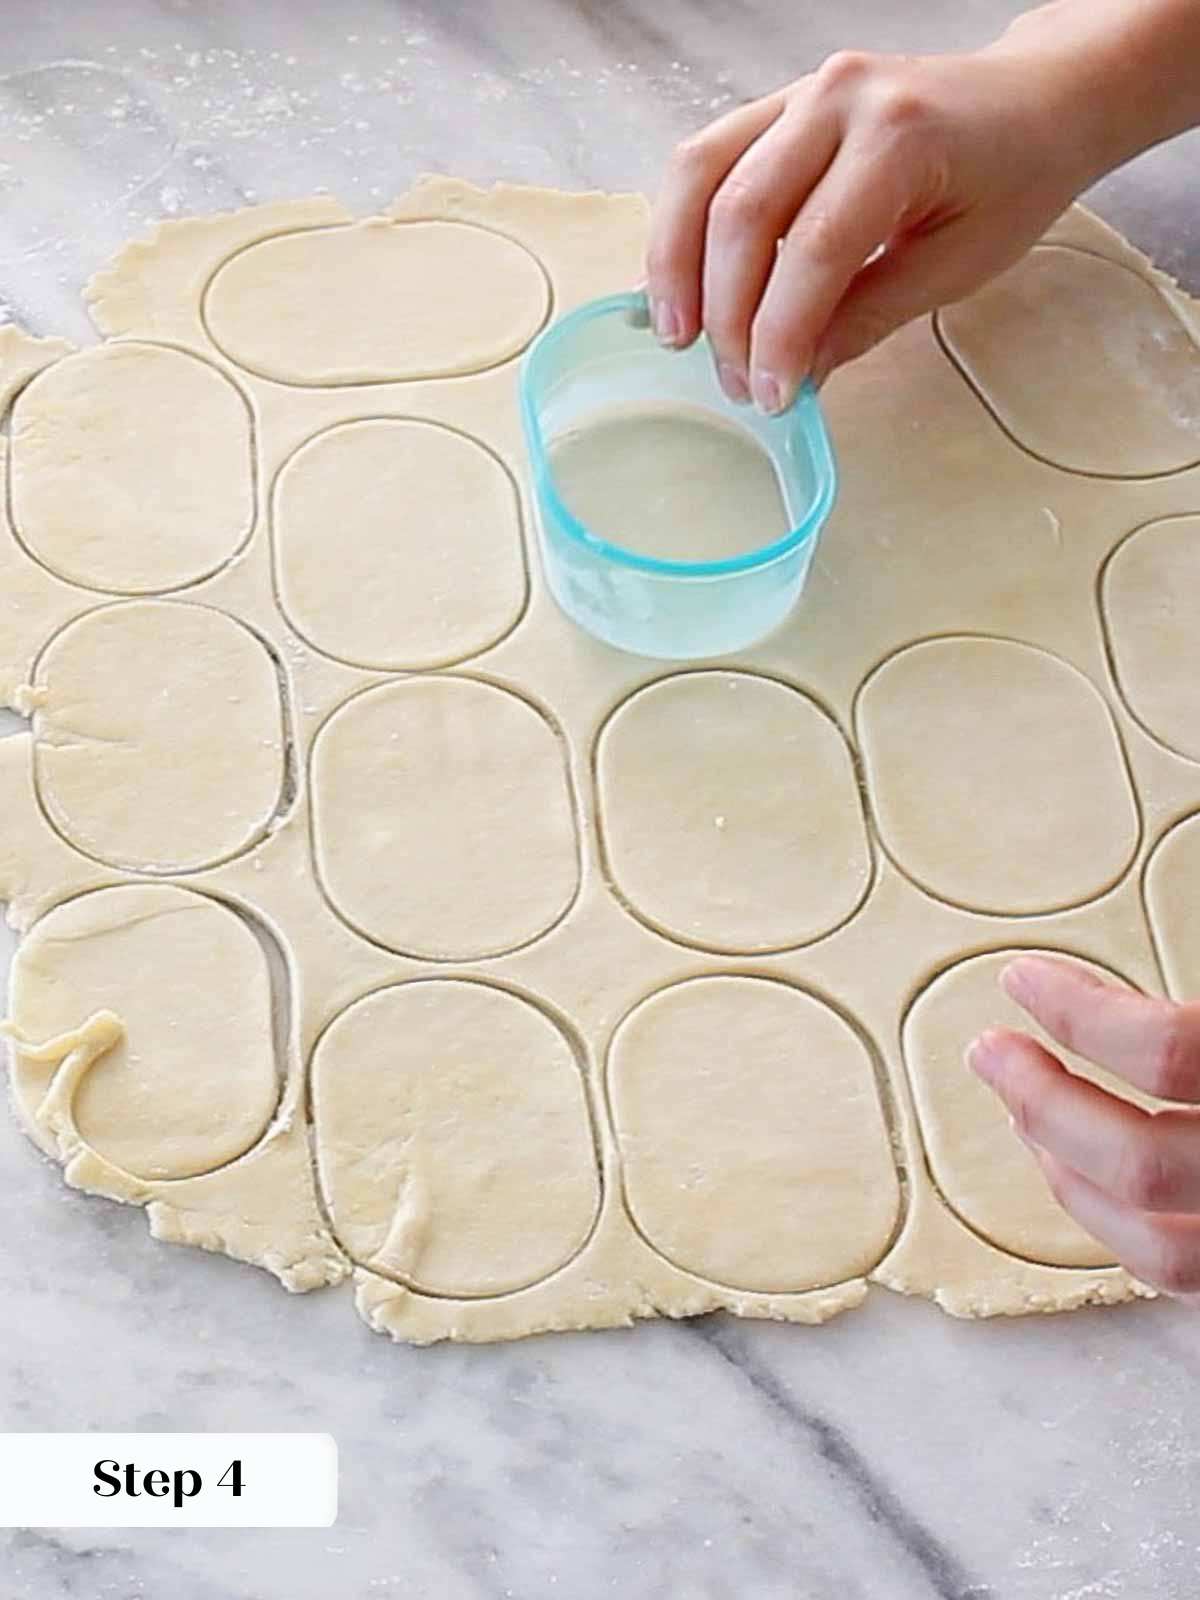
Step 4: On a lightly floured surface, roll out the pie crust to about an 1/8th inch thick. Cut out your desired shapes or just cut squares/rectangles with a fluted pie cutter. Make sure you have an even number of shapes!
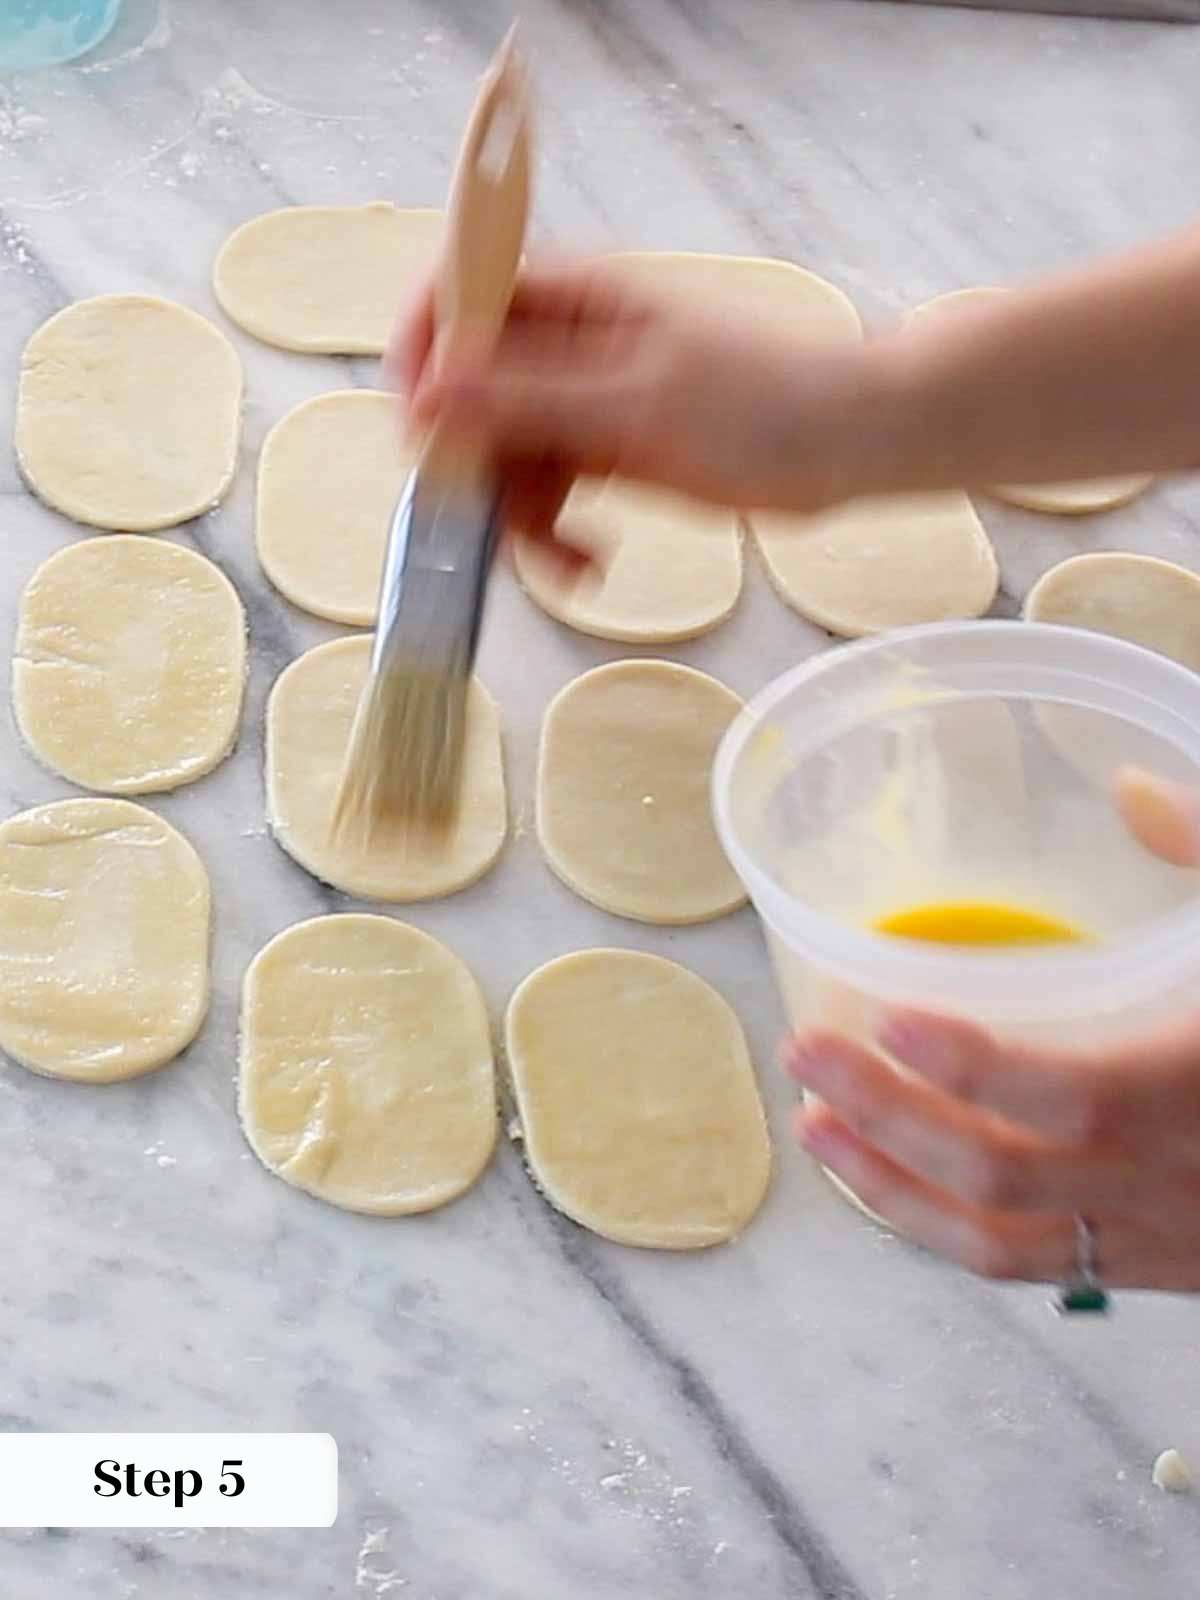
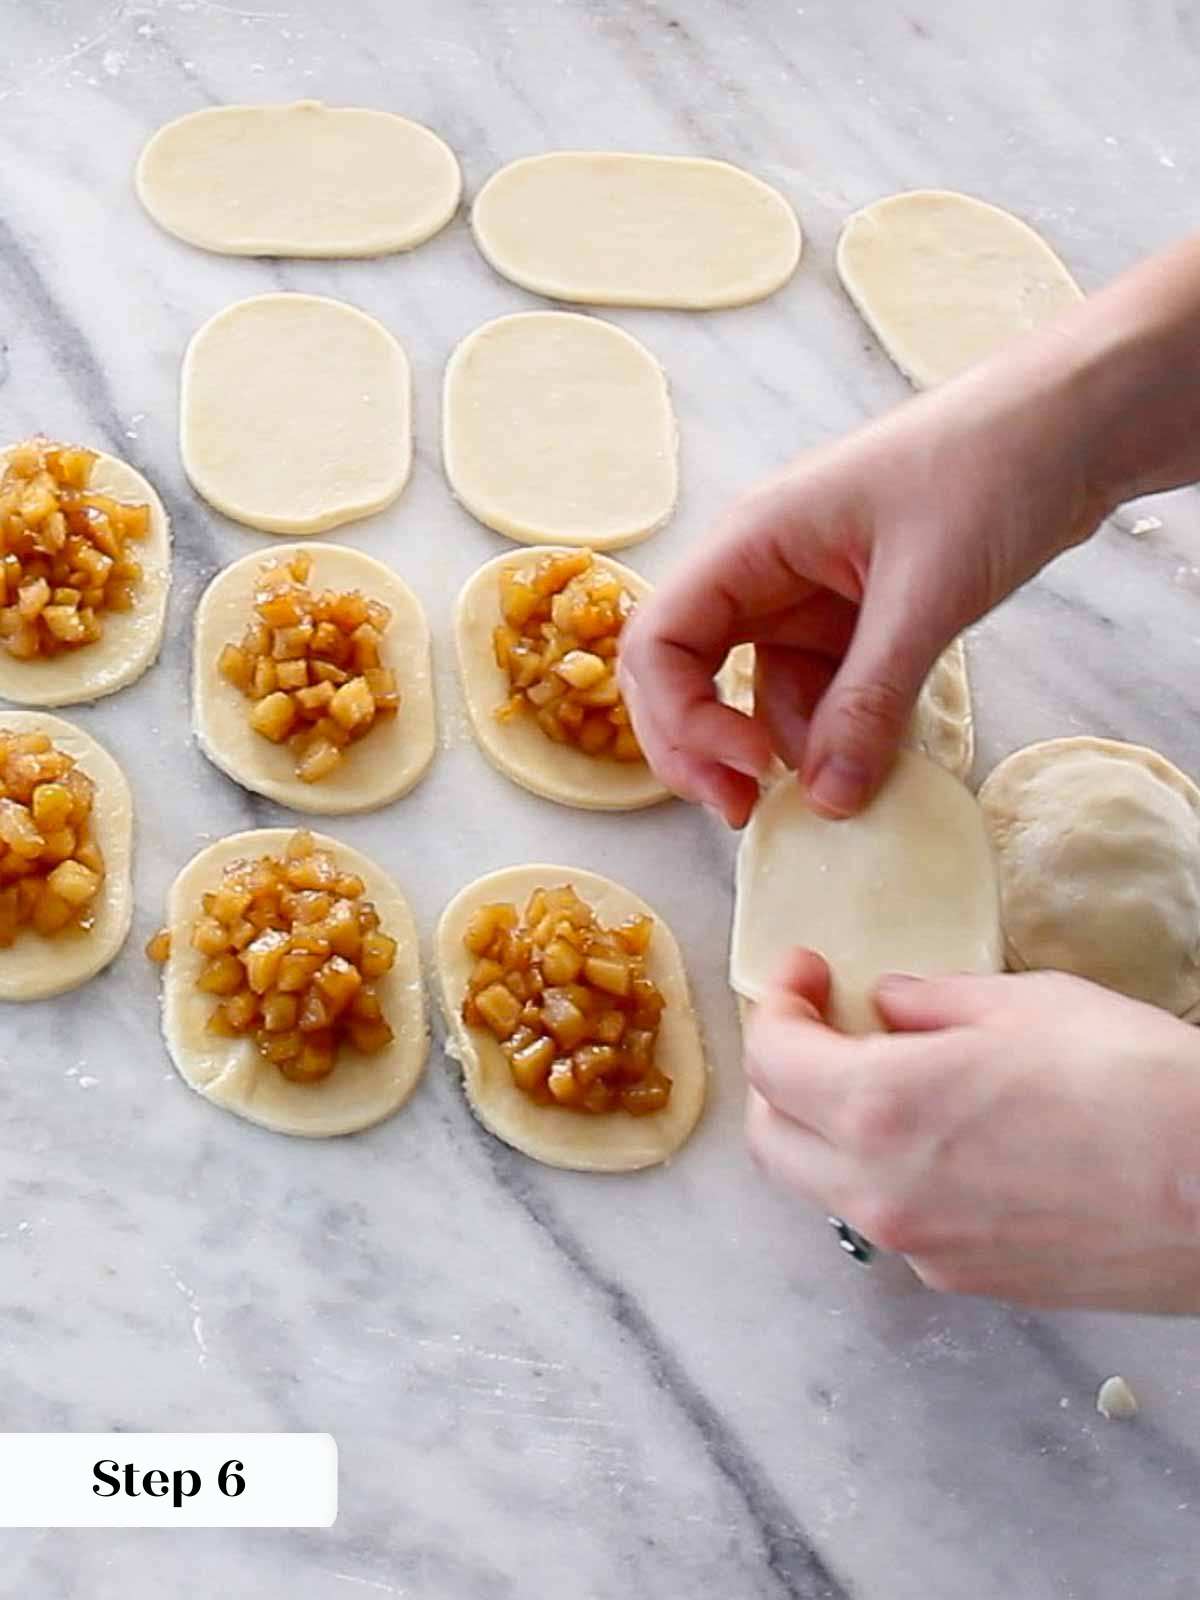
Step 5: Brush one side with beat egg and then dollop about 2 tablespoons of filling in the center of each one. You want a generous amount but not so much that they won’t close!
Not sure if it’s enough filling? Try closing one. If you have to pull the dough to close it or the filling is encroaching on your seal, then it has too much filling. Use less filling on the next one.
Step 6: Cover the sides with fillings with an unfilled shape and press closed. Seal with your fingers or with the tines of a fork. Chill for at least 30 minutes before baking. You can also freeze them!
Firmly press the tines of a fork around the edges to seal the layers together, but be careful not to puncture the dough with the fork above the seal or the filling will leak out through those holes!
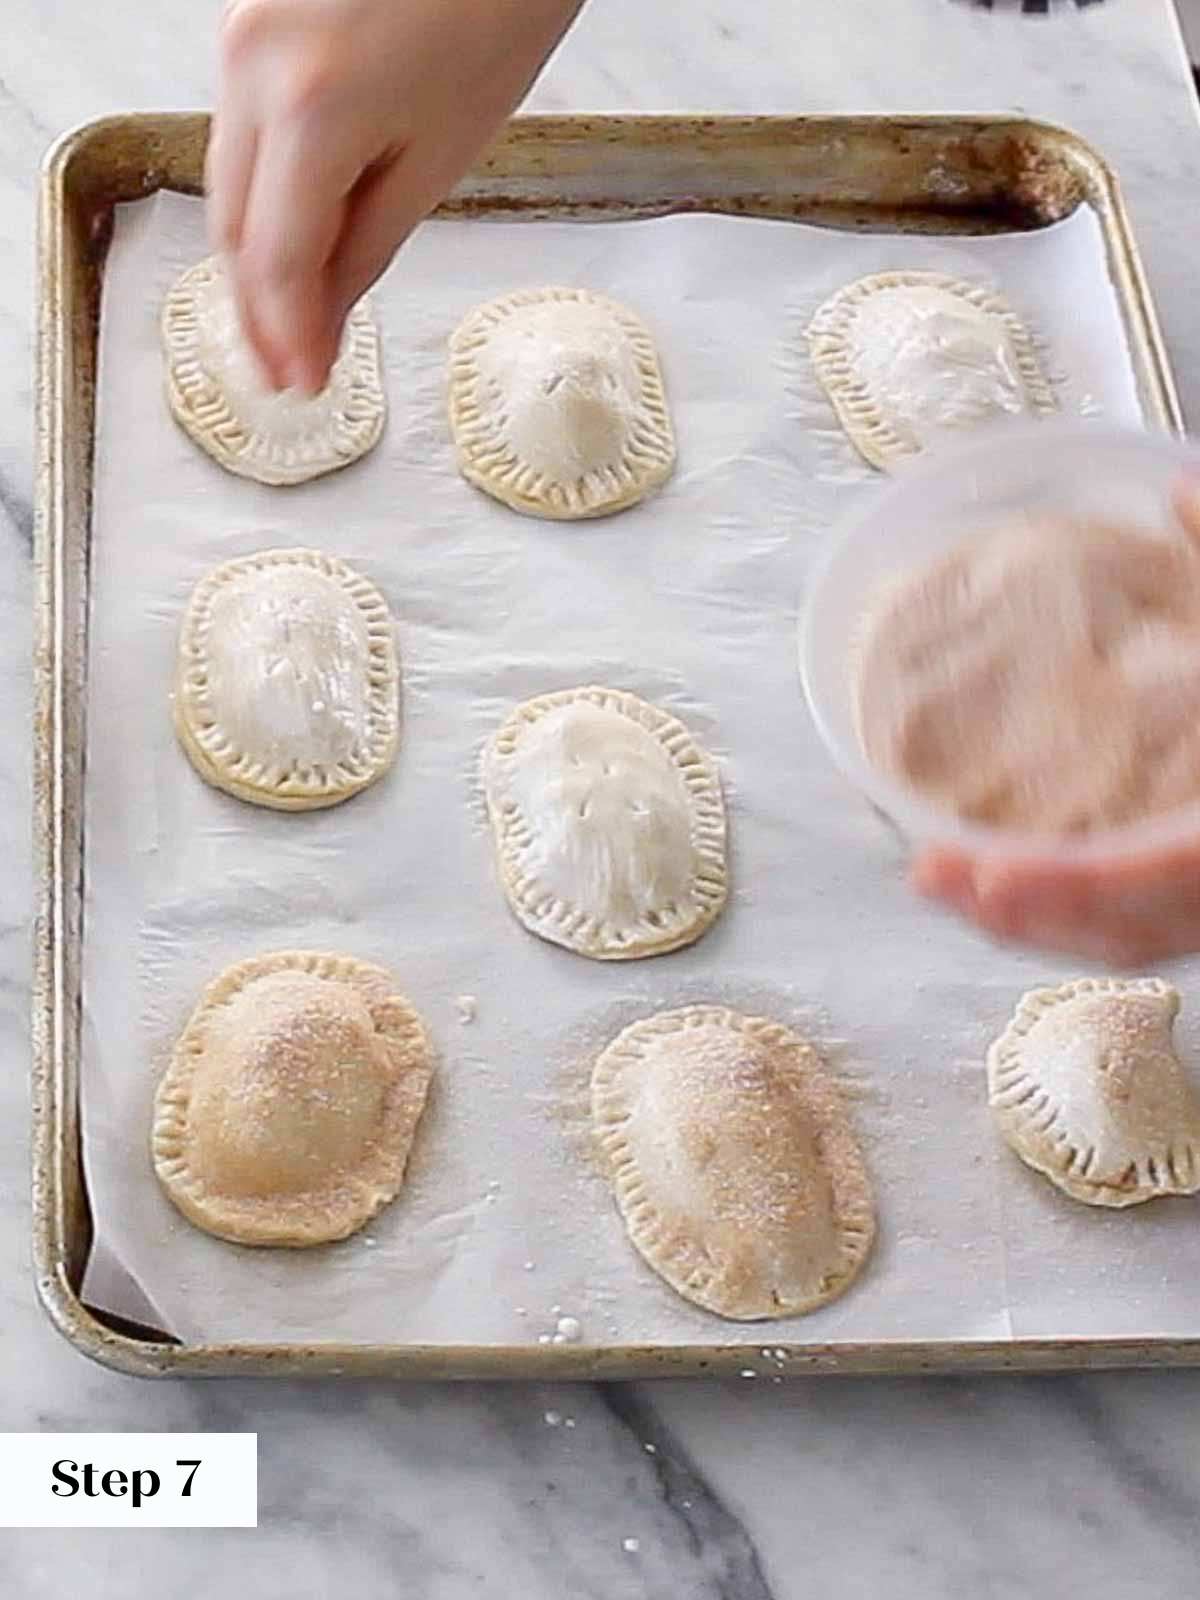
Step 7: Before baking cut a few slits in the tops for ventilation. Brush with a little heavy cream and sprinkle generously with cinnamon sugar or turbinado sugar!
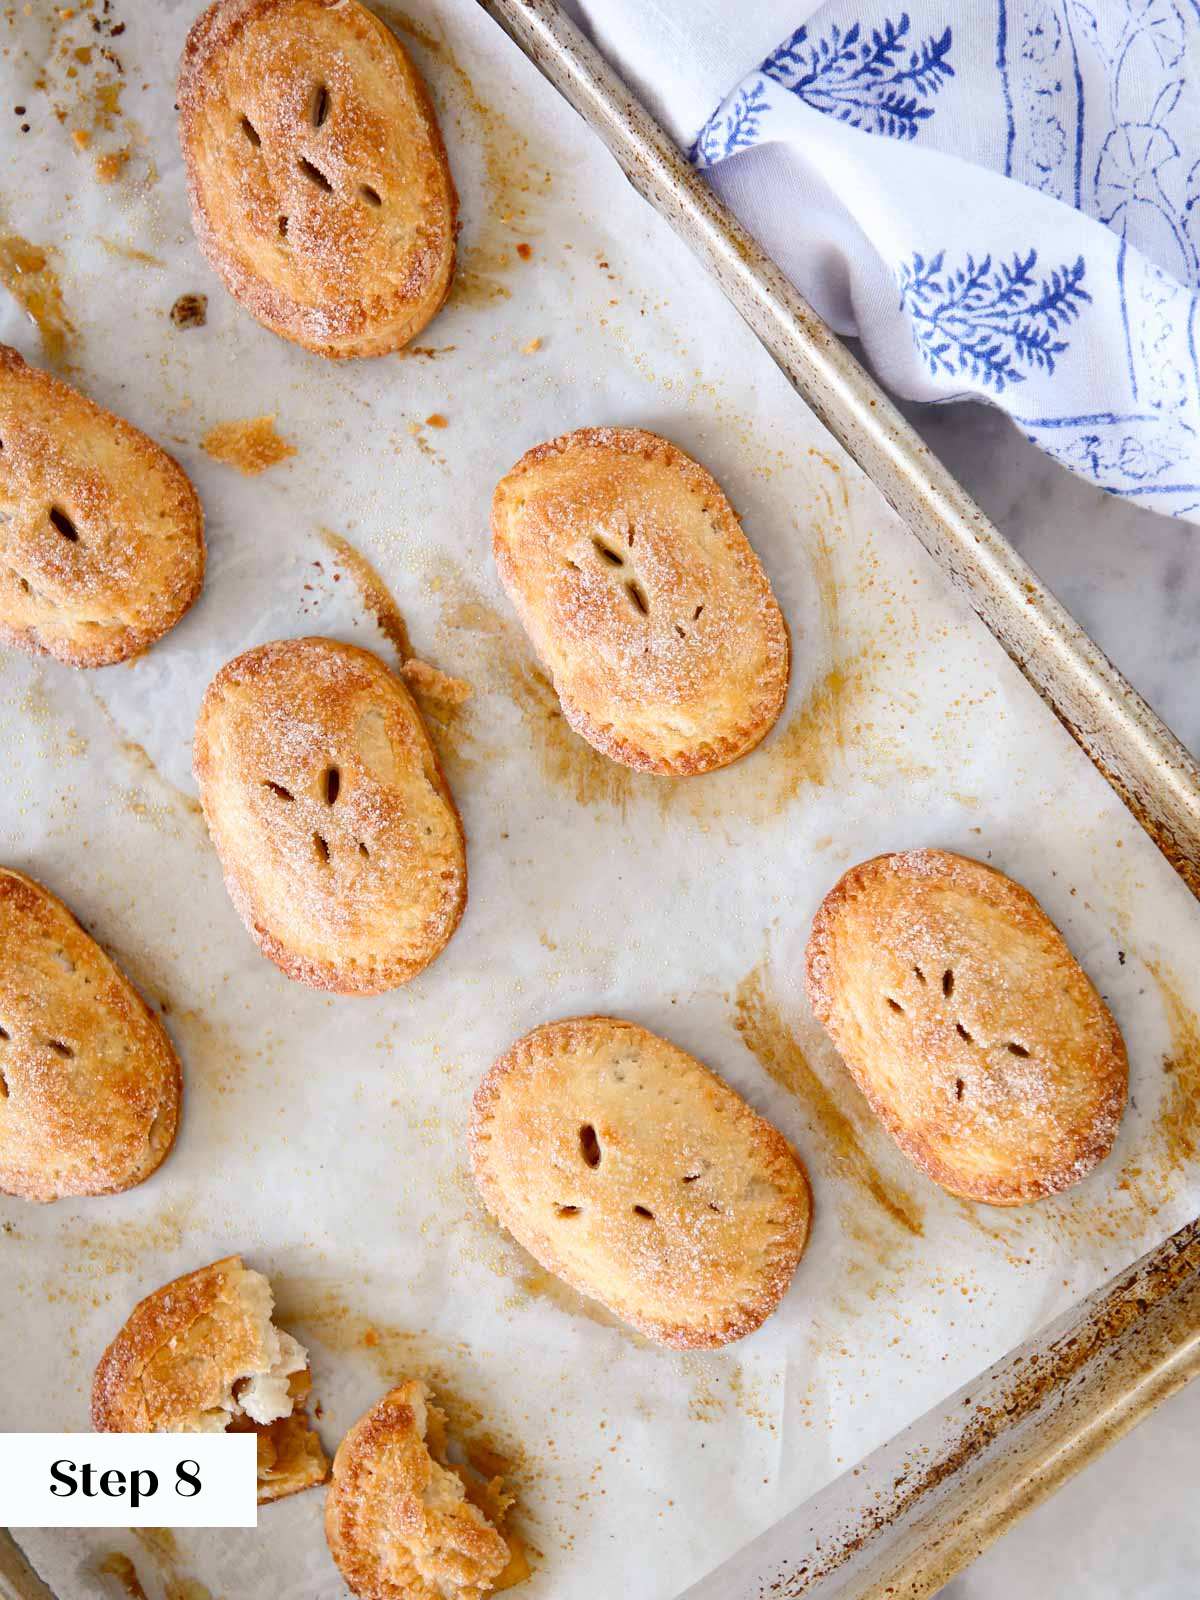
Step 8: Bake in preheated oven for about 20 minutes or until you can see the filling bubbling and they are a nice golden brown.
Chef Lindsey’s Recipe Tip
Pre-cooking the filling is a must here. Hand pies don’t cook long enough for the apples to soften and the flavors to meld. Pre-cooking it on the stovetop ensures a perfect texture in every bite! Be sure to cool the filling before assembling or you’ll undo all that hard work on your crusts.
Recipe FAQs
Store assembled, unbaked hand pies in the freezer for up to 2 months. Freeze on a baking sheet and then place in a ziptop baggie. Bake directly from frozen.
Baked hand pies should be cooled and stored in an air-tight container at room temperature for 5 days, refrigerated for 10 days or frozen for 2 months. I prefer to refresh pies in the oven prior to serving.
Part of the charm of hand pies is that they are a hand-held dessert that needs nothing to make it better! Part of my charm as a pastry chef is making all things better. In the restaurants I would serve 3 mini hand pies with a selection of dipping sauces like bourbon caramel sauce and orange crème anglaise. They are also simply amazing with vanilla ice cream or caramel ice cream.
The difference is mainly in the crust and shape. Turnovers are often made with classic puff pastry cut into larger squares. The filling is placed in the center and then the square is folded in half on the diagonal, which is why turnovers are typically triangular. Hand pies are made with pie crust and can be any shape, though most often circles.
The first step to keep hand pies from leaking is keeping the dough from shrinking. Keep it cold throughout the assembling process. Cutting vent holes and creating a firm seal around the edges will also prevent filling from leaking out. I use egg wash around the edges and then firmly press them together with a fork. It’s pretty and functional.
Recommended Apple Dessert Recipes
Fall Dessert Recipes
21 Best Apple Dessert Recipes
Pies and Tart Recipes
Mile High Apple Pie
Crisps & Crumble Recipes
Easy Apple Cobbler Recipe
Christmas Cookie Recipes
Mini Apple Pies
If you tried this recipe and loved it please leave a 🌟 star rating and let me know how it goes in the comments below. I love hearing from you; your comments make my day!

Apple Hand Pies
Ingredients
For the Pie Crust:
- 1 ¼ cups all-purpose flour
- ½ teaspoon kosher salt
- 1 tablespoons sugar
- ½ cup unsalted butter cubed
- 2 tablespoons vodka frozen
- 2 tablespoons ice water
For the Filling:
- 3 apples I used honeycrisp, granny smith & Cripps pink
- 3 tablespoons sugar
- 3 tablespoons light brown sugar
- ½ teaspoon ground ginger
- 1 teaspoon cinnamon
- 1 lemon juiced
For the Assembly:
- 1 egg for egg wash
- 1 tablespoon heavy cream
- ¼ cup granulated sugar
- 1 teaspoon cinnamon
Instructions
Make the pie crust:
- In the bowl of a stand mixer fitted with the paddle attachment, combine the flour, salt, sugar and butter. On low speed cut the butter into the flour until you have some larger pieces but most of the butter has worked into the flour. You will notice that the flour will change color and be slightly darker.
- Stop the mixer and pour the vodka over the top of the crust. Turn the mixer back on low and slowly pour the water over the crust. Mix on low until the flour has hydrated but a cohesive dough has not yet formed.
- Turn out onto a countertop and press gently until a dough forms. It will be a little wet, but that is ok! Divide the dough in half. Press out into disks and wrap in plastic wrap.
- Refrigerate until cold, at least 2 hours and up to 3 days. Alternatively you can freeze it for up to 2 months. Thaw it in the refrigerator before using. Make sure to keep it cold!
Make the filling:
- Peel and dice the apples so they are about ½ -1 cm in diameter.
- In a small pot combine all the ingredients for the filling and mix to coat the apples.
- Heat on medium low until the apples begin releasing their juices. Increase heat to medium high until the juices are thickened and the apples are tender. Pour on to parchment lined baking sheet or dish to cool.
Assembling the Hand Pies:
- Preheat oven to 375°F.
- On a lightly floured surface, roll out the pie crust to about an ⅛th inch thick. Cut out your desired shapes or just cut squares/rectangles with a fluted pie cutter. Make sure you have an even number of shapes!
- Brush one side with a pre-beaten egg and then dollop about 2 tablespoons of filling in the center of each one. You want a generous amount but not so much that they won’t close! You’ll know.
- Cover the sides that have fillings with an unfilled shape and press closed. Seal with your fingers or with the tines of a fork.
- Chill for at least 30 minutes before baking. You can also freeze them!
- Before baking, cut a few slits in the tops for ventilation. Brush with a little heavy cream and sprinkle generously with cinnamon sugar or turbinado sugar!
- Bake in preheated oven for about 20 minutes or until you can see the filling bubbling and they are a nice golden brown.
Video
Notes
Nutrition
Before You Go
I hope you enjoyed this professional chef tested recipe. Check out our other delicious, chef-developed pie recipes, such as my puff pastry recipe! You might also enjoy these 21 Best Apple Dessert Recipes!


The pie dough really makes these hand pies stand out! It is crispy, flaky, and tastes amazing! I made the pie dough one day, then the filling the next, and assembled it on the third day. It really made the whole process seem really easy.
Could I use apple cider vinegar in place of the vodka?
Hi Staci! You can make these with a different crust. You could use this all-butter pie crust or make it vegan with a crisco pie crust! Happy baking!
the most useful/helpful part of your recipe is the tips and notes…Thank you!
Hi Li! Thank you, I’m glad my experiences can be of use! ?